9.8 Creating forms
The ability for someone to collect information or purchase items over the internet is a standard feature on many websites. One way to do this is to set up a form. Creating an interactive form for the web is a two-part process. First you lay out the form’s objects (called fields) and then you link the objects to a common gateway interface (CGI) script, which has to be done in consultation with your web host or using your website’s Content Management System (CMS).
Skills practised
- Creating a form
- Text fields
- Email fields
- Popup lists
- Field properties
Webpage authoring exercise 8
Setting up the form page
- Create a new page from the mm_template page.
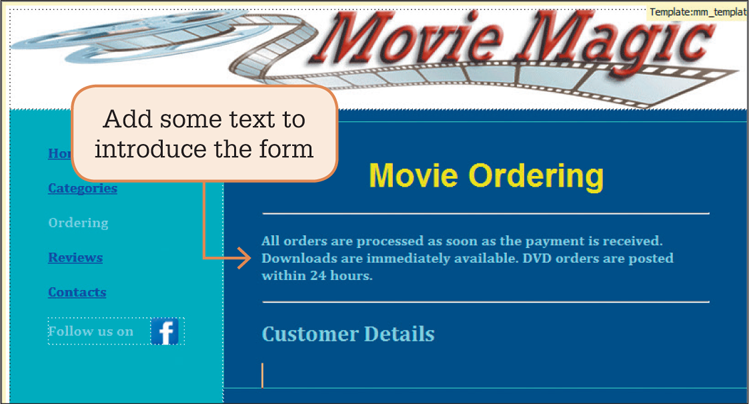
- Highlight the
CONTENTlabel in the lower right cell, press<Enter>or<Return>to leave a blank line and enter the text shown in the diagram. - Format the heading to the
HEADINGstyle, the paragraph to the Table_Text style and the Customer Details heading to the Table_Heading style.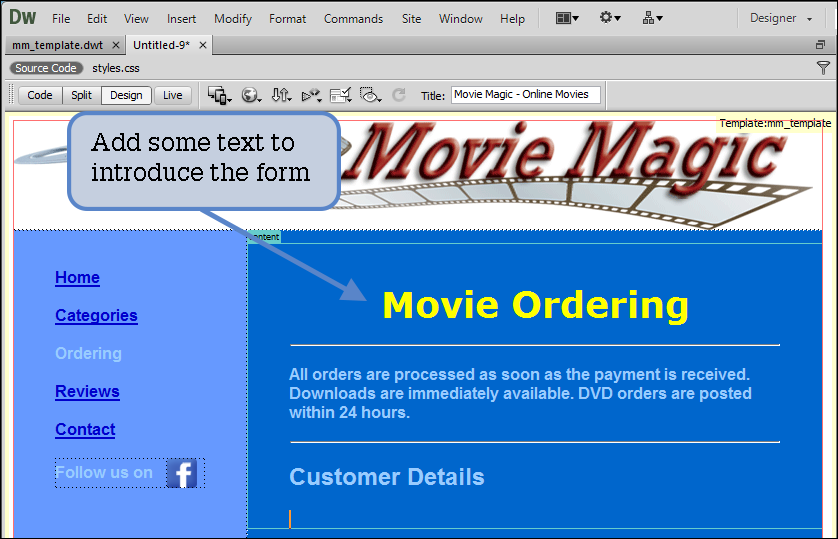
- Use the
BLOCKQUOTEicon to indent the text and add horizontal rules if you wish to. - Save the page as orders.html.
Inserting a form tag
When creating a form you must tell the program that a form will be asking for information from the user. To do this, all the details within a form MUST be contained within an area called a FORM TAG, so whenever you enter fields you must first insert a FORM TAG.
- Click to the right of the
CUSTOMER DETAILSheading, press<Enter>or<Return>to move the cursor to the next line and open theFORMSsection of theINSERTpanel. - Select the
FORMicon to insert theFORM TAG.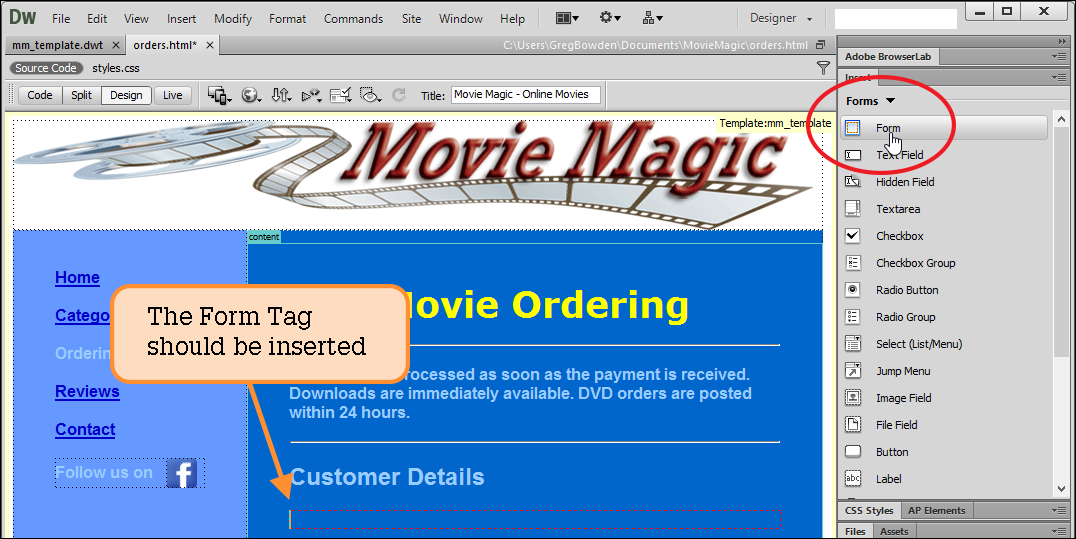
- Click inside the
FORM TAGframe, which is a dotted red frame, and press<Enter>or<Return>a few times to increase the size of the tag frame. This will ensure that you don’t accidentally click outside the tag frame as you complete the rest of the form.
Inserting text fields
A variety of different fields can be used in forms to collect data from users. These include text fields, lists or menus, radio buttons or check boxes. The fields are found in the FORM section of the INSERT panel. TEXT FIELDS allow the user to enter text such as names and addresses. You specify how wide the text field will be.
- Click on the top line of the
FORM TAGand open theCOMMONsection of theINSERTpanel. - Use the
TABLEicon to insert a three-row, two-column table with a 500 pxWIDTHand noCELL BORDER,CELL PADDINGorCELL SPACING. - Enter the labels shown in the first column of the table and format them to the Table_Text style.
- Use the table borders to increase the height of each row and decrease the width of the first column to just enclose the headings.
Note: You could create a new CSS style that right-aligns the labels if you wanted to.
- Click in the cell next to the
NAMElabel, open theFORMSsection of theINSERTtab and click on theTEXTicon to insert a text field. - Select
OKto theATTRIBUTESdialogue box if it is displayed. - Click on the text field box and, in the
PROPERTIESpanel, set theNAMEbox to NAME, theSIZEbox to 65 characters and theMAXbox to 80.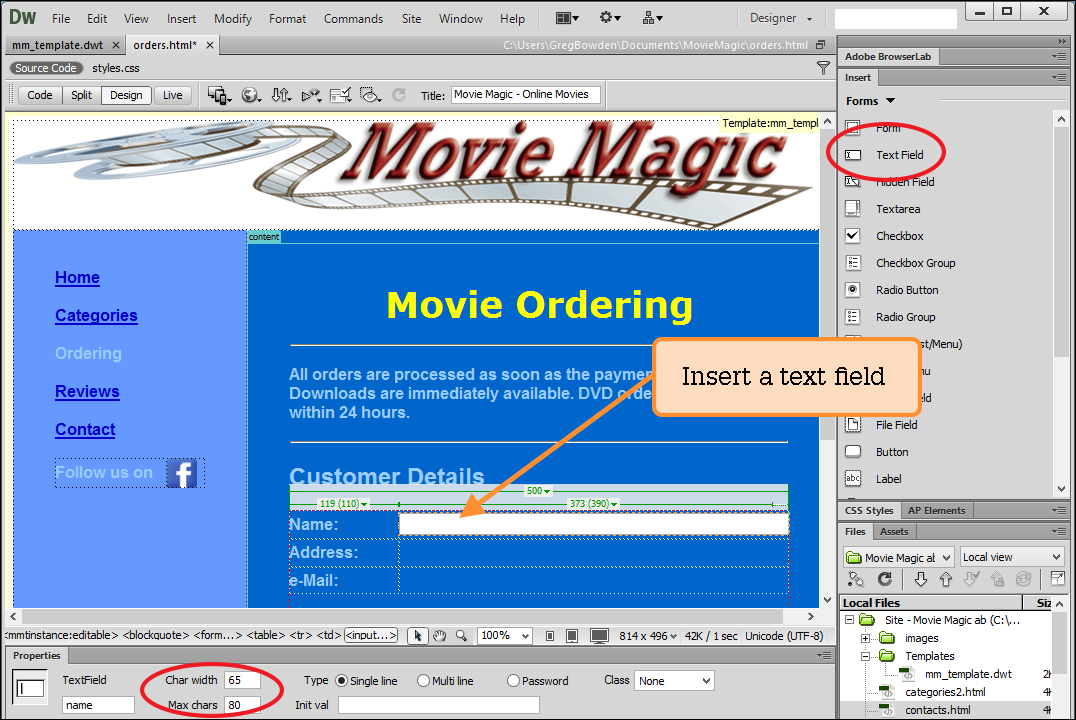
Note: Setting theMAXbox to a higher value than theSIZEbox allows for unusually long entries to be entered. You could set the field box to a CSS style using theCLASSbox, but fields have a white background, so it is not needed in this case. - Repeat steps 5 to 7 to insert a
TEXTfield named ‘address’ next to theADDRESSlabel and anEMAILfield named ‘email’ next to theEMAILlabel.
Note: Email fields are text fields that check that an email address structure has been entered that includes a @ symbol. - Save the page, preview it in a browser and check that entries can be entered into the field boxes. If you can’t, the fields are probably outside the
FORM TAG.
Popup field lists
Popup field lists provide options for the user to select from. This restricts the user to set options and reduces the chance of incorrect entries being submitted. You can also use radio buttons and check boxes for this purpose.
- Click on the blank line below the table, but check that this is still inside the dotted red
FORM TAGand press<Enter>or<Return>. - Enter the heading: Movie Details and format it to the Table_Heading style.
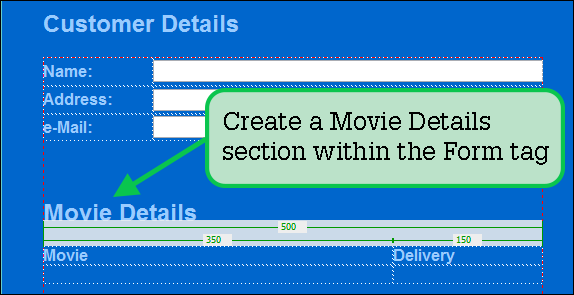
- Click on the blank line below the heading and insert a two-row, two-column table with a 500 px
WIDTHand noCELL BORDER,CELL PADDINGorCELL SPACING. - Enter the labels shown in the first column of the table and format them to the Table_Text style.
- Increase the width of the first column to 350 px.
- Insert a
TEXTfield in the cell underMOVIE, selectOKto theATTRIBUTESdialogue box if it opens, select the field and, in the PROPERTIES panel, set theNAMEbox toMOVIE, theSIZEbox to 50 and theMAXbox to 60. - Click in the cell under
DELIVERYand insert aSELECT (LIST/MENU)field. - In the
PROPERTIESpanel set theNAMEbox toDELIVERYand click on theLIST VALUESbutton. - Enter the
ITEM LABELandVALUEitems shown in the following diagram.
Note: TheITEM LABELis the label displayed in the popup list. TheVALUEis the data value that is sent to the owner of the website when the form is submitted. TheITEM LABELandVALUEdo not have to be the same.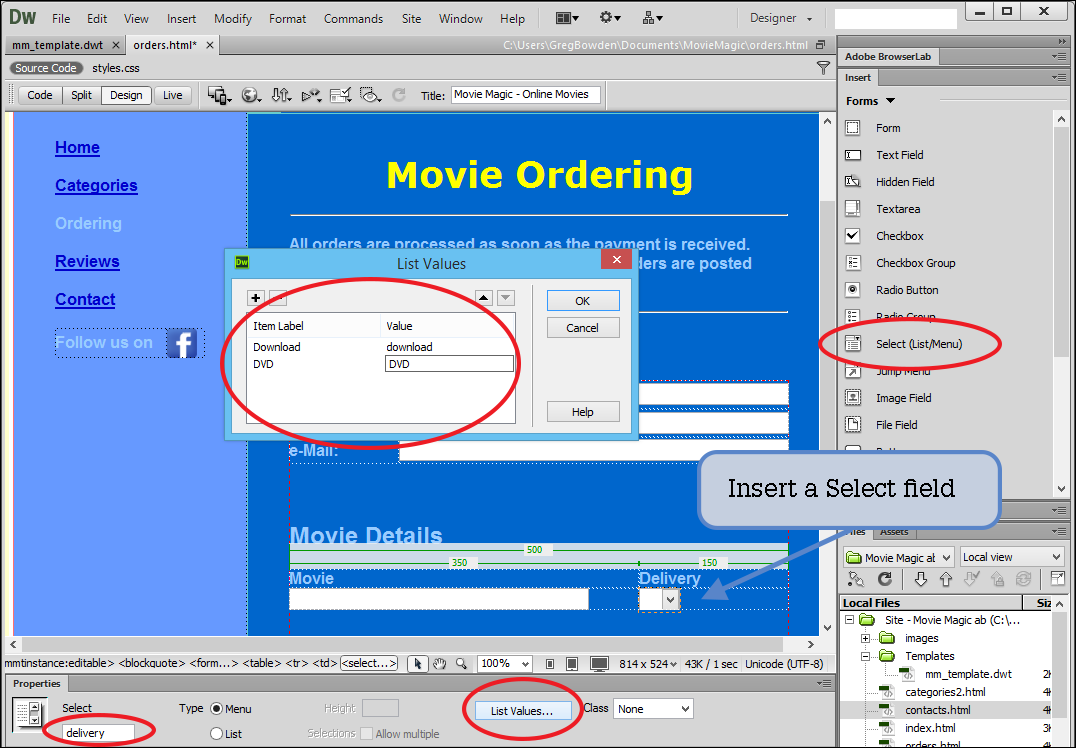
- In the
PROPERTIESpanel click onDOWNLOADin theSELECTEDbox so that is the first value displayed in the popup list.
Note: You could add more rows and fields to the tables so that more movies could be ordered at the one time. - Save the page, preview it in a browser and check that entries can be selected from the popup list.
Submit and reset buttons
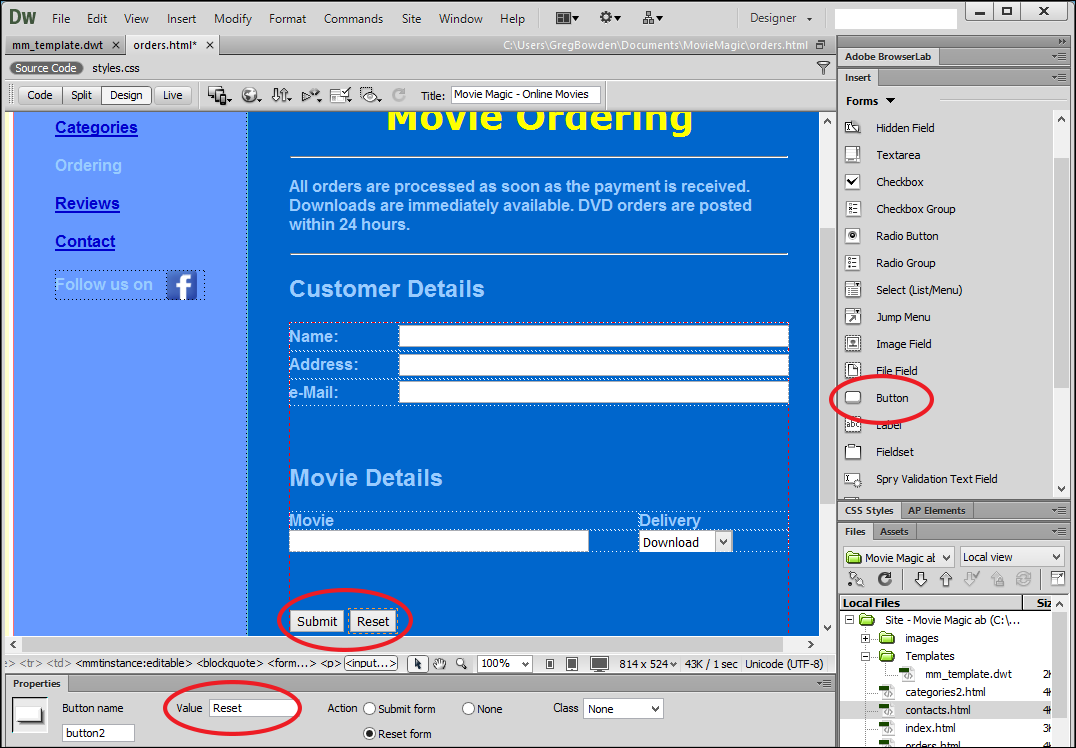
Users can be given the option to SUBMIT the entries of the form or RESET the values so the form is blank.
- Click on the blank line below the last table, but check that this is still inside the dotted red
FORM TAGand press<Enter>or<Return>. - Click on the
BUTTONicon in theFORMsection of theINSERTpanel to insert aSUBMITbutton. - Click on the
BUTTONicon again in theFORMsection of theINSERTpanel to insert a button and, in thePROPERTIESpanel click on theRESET FORMaction.
Setting the form properties
To complete the form it should be named and information about how the form is to be sent to the owner selected.
- In the
STATUS BARclick on the<FORM#FORM1> - In the
PROPERTIESpanel set theFORM IDtoORDERS, in theACTIONbox enter an email address such as[email protected]and leave theMETHODbox asPOST.
- Save the page, preview it in a browser and check that the form works. The
SUBMITbutton will not operate without a cgi script, but theRESETbutton should clear the form.
Note: You could insert aTEXT AREAfield if you want users to enter detailed comments. - Open the mm_template file and set the
ORDERNGtext to link to the orders.html page. - Save the file and select
UPDATEto update the files that are set to the template. There are now five pages set to it.
Webpage authoring exercise 8
Setting up the form page
Skills practised
- Creating a form
- Text fields
- Email fields
- Popup lists
- Field properties
- Create a new page from the mm_template.dwt page.
- Highlight the
CONTENTlabel in the lower right cell, press<Enter>or<Return>to leave a blank line and enter the text shown in the diagram. - Format the heading to the Heading style, the paragraph to the Table_ Text style and the Customer Details heading to the Table_ Heading style.
- Use the
BLOCKQUOTEicon to indent the text and add horizontal rules if you wish to. - Save the page as orders.html.
Inserting a form tag
When creating a form you must tell the program that a form will be asking for information from the user. To do this, all the details within a form MUST be contained within an area called a Form tag, so whenever you enter fields you must first insert a Form tag.
- Click to the right of the
CUSTOMER DETAILSheading, press<Enter>or<Return>to move the cursor to the next line and open theFORMsection of theINSERTtab. - Select the
FORMicon to insert theFORM TAG.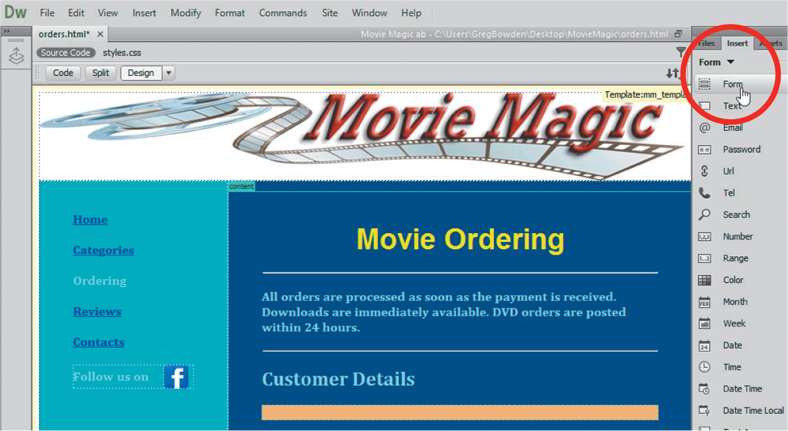
- Click inside the
FORM TAGframe, which is a dotted red frame and press<Enter>or<Return>a few times to increase the size of the tag frame. This will ensure that you don’t accidentally click outside the tag frame as you complete the rest of the form.
Inserting text fields
A variety of different fields can be used in forms to collect data from users. These include text fields, lists or menus, radio buttons or check boxes. The fields are found in the FORM section of the Insert panel. TEXT FIELDS allow the user to enter text such as names and addresses. You specify how wide the text field will be.
- Click on the top line of the
FORM TAGand open theHTMLsection of the Insert panel. - Use the
TABLEicon to insert a three-row, two-column table with a 500 px width and no cell border, cell padding or cell spacing. - Enter the labels shown in the first column of the table and format them to the Table_Text style.
- Use the table borders to increase the height of each row and decrease the width of the first column to just enclose the headings.
Note: You could create a new CSS style that right-aligns the labels if you wanted to.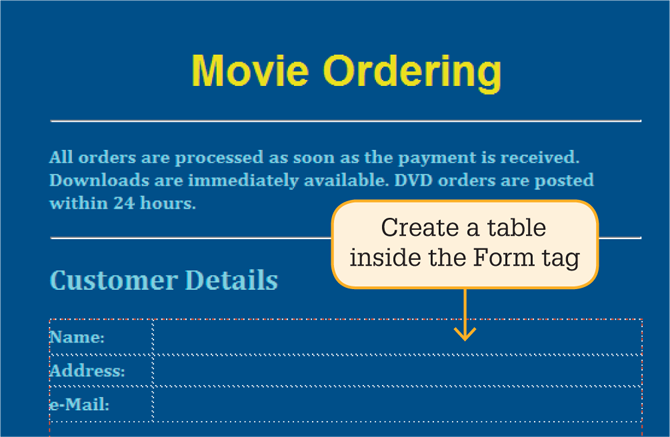
- Click in the cell next to the
NAMElabel, open theFORMsection of theINSERTtab and click on theTEXTicon to insert a text field. - The field has its own label included, which is not needed in this case, so highlight the label and delete it.
- Click on the text field and, in the Properties panel, set the
NAMEbox toNAME, theSIZEbox to 65 characters and theMAXbox to 80.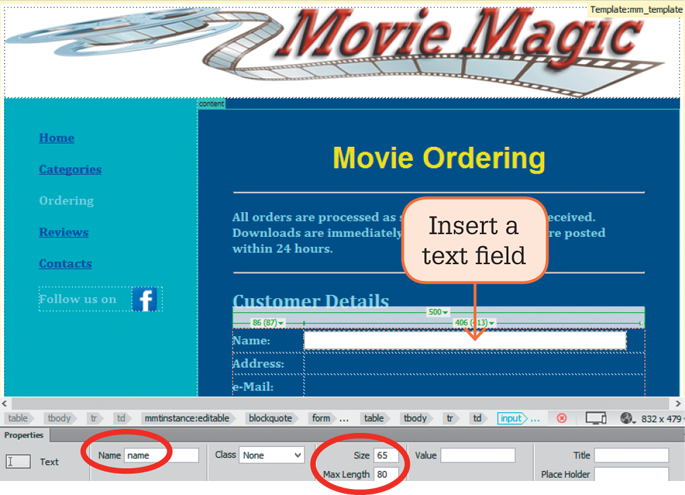
Note: Setting theMAXbox to a higher value than theSIZEbox allows for unusually long entries to be entered. You could set the field box to a CSS style using theCLASSbox, but fields have a white background, so it is not needed in this case. - Repeat steps 5 to 7 to insert a
TEXTfield named ‘address’ next to theADDRESSlabel and anEMAILfield named ‘email’ next to theEMAILlabel.
Note: Email fields are text fields that check that an email address structure has been entered that includes a @ symbol. - Save the page, preview it in a browser and check that entries can be entered into the field boxes. If you can’t, the fields are probably outside the
FORM TAG.
Popup field lists
Popup field lists provide options for the user to select from. This restricts the user to set options and reduces the chance of incorrect entries being submitted. You can also use radio buttons and check boxes for this purpose.
- Click on the blank line below the table, but check that this is still inside the dotted red
FORM TAGand press<Enter>or<Return>. - Enter the heading Movie details and format it to the Table_Heading style.

- Click on the blank line below the heading and insert a two-row, two-column table with a 500 px width and no cell border, cell padding or cell spacing.
- Enter the labels shown in the first column of the table and format them to the Table_Text style.
- Increase the width of the first column to 350 px.
- Insert a
TEXTfield in the cell underMOVIE, remove its label then select the field and, in the Properties panel, set theNAMEbox toMOVIE, andSIZEbox to 50 and theMAXbox to 60. - Click in the cell under
DELIVERYand insert aSELECTfield. - Remove the field’s label and, in the Properties panel, set the
NAMEbox toDELIVERYand click on theLISTVALUESbutton. - Enter the
ITEM LABELandVALUEitems shown in this diagram.
Note: TheITEM LABELis the label displayed in the popup list. TheVALUEis the data value that is sent to the owner of the website when the form is submitted. TheITEM LABELandVALUEdo not have to be the same.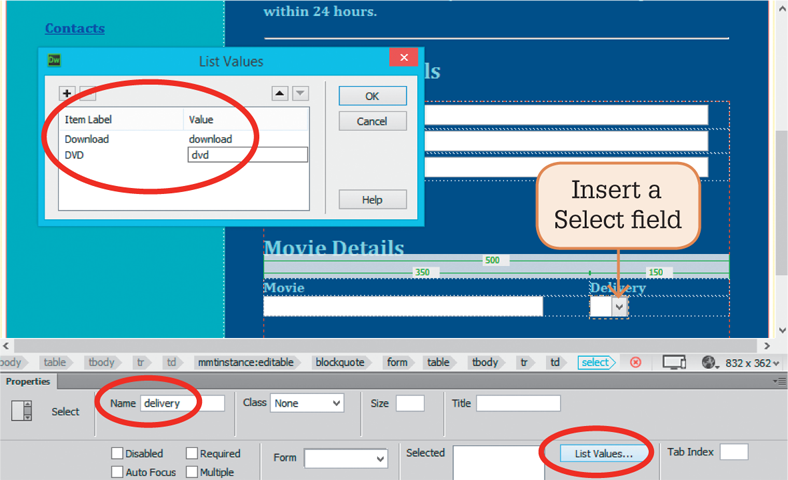
- In the Properties panel click on
DOWNLOADin theSELECTEDbox so that is the first value displayed in the popup list.
Note: You could add more rows and fields to the tables so that more movies could be ordered at the one time. - Save the page, preview it in a browser and check that entries can be selected from the popup list.
Submit and reset buttons
Users can be given the option to SUBMIT the entries of the form or RESET the values so the form is blank.
- Click on the blank line below the last table, but check that this is still inside the dotted red
FORM TAGand press<Enter>or<Return>. - Click on the
SUBMIT BUTTONicon in theFORMsection of the Insert panel to insert aSUBMITbutton. - Click on the
RESET BUTTONicon in theFORMsection of the Insert panel to insert aRESETbutton.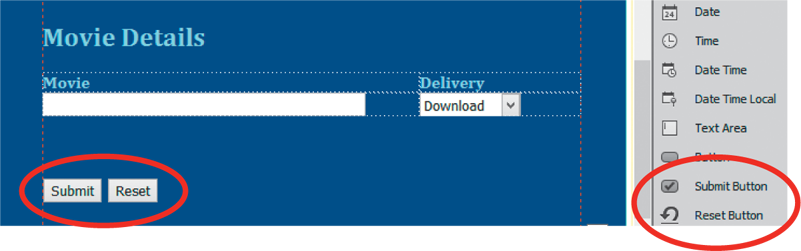
Setting the form properties
To complete the form it should be named and information about how the form is to be sent to the owner selected.
- In the
STATUS BARclick on theFORMtag to select the whole form. - In the Properties panel set the
IDtoORDERS, in theACTIONbox enter an email address such as[email protected]and leave theMETHODbox asPOST.
- Save the page, preview it in a browser and check that the form works. The
SUBMITbutton will not operate as you have not been able to set up a CGI script with an internet host, but theRESETbutton should clear the form.
Note: You could insert aTEXT AREAfield if you want users to enter detailed comments. - Open the mm_template.dwt file and set the ‘Ordering’ text to link to the orders.html page, the ‘Update’ to files that are set to the template. There are now five pages.