When setting up a webpage you usually have sections of the page that are the same on each page. This includes a banner and navigation sections. An efficient way to do this is to enter these sections into a page and save that page as a template, which is then used to set up all the other pages in the site.
When changes are needed to the banner or navigation, those changes are just made to the template page and the changes are then automatically updated in all pages that were created from the template.
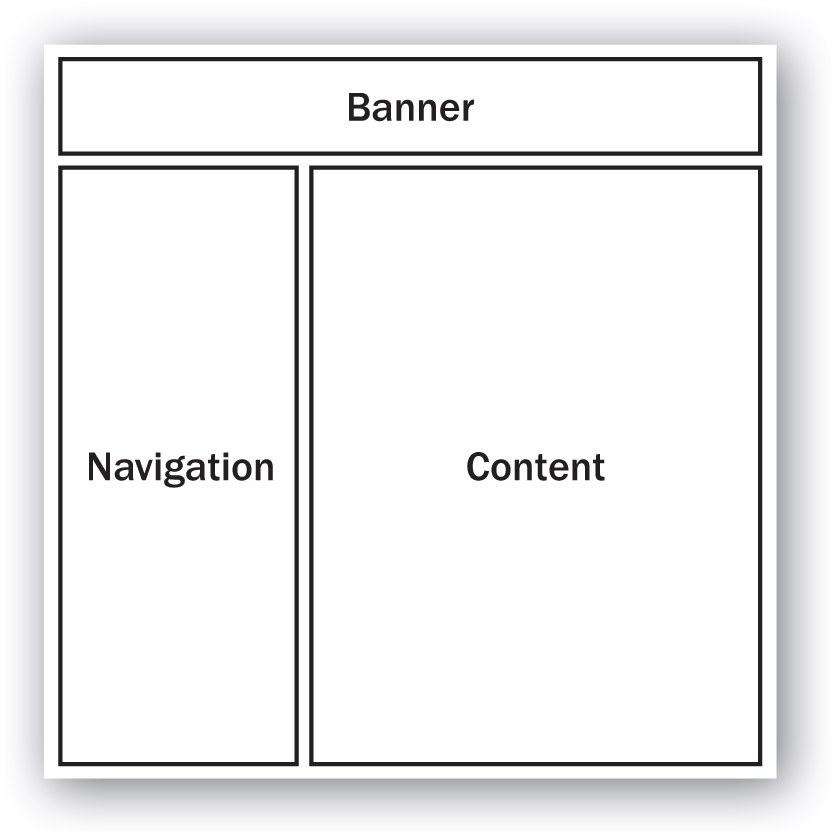
When creating templates for more detailed websites, HTML code is entered to divide a page into sections. The code is call DIV tags. To simplify things in this case, a table will be used to create a template that has banner, navigation and content sections as shown in the diagram.
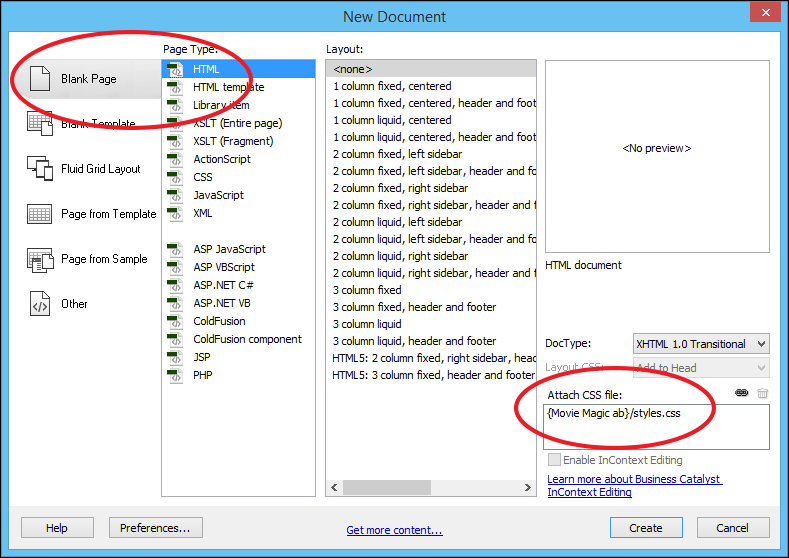
Open your Movie Magic site and select NEW from the FILE menu.
Select BLANK PAGE and HTML in the PAGE TYPE frame. Check that the ATTACH CSS box is set to the styles.css file and select CREATE.
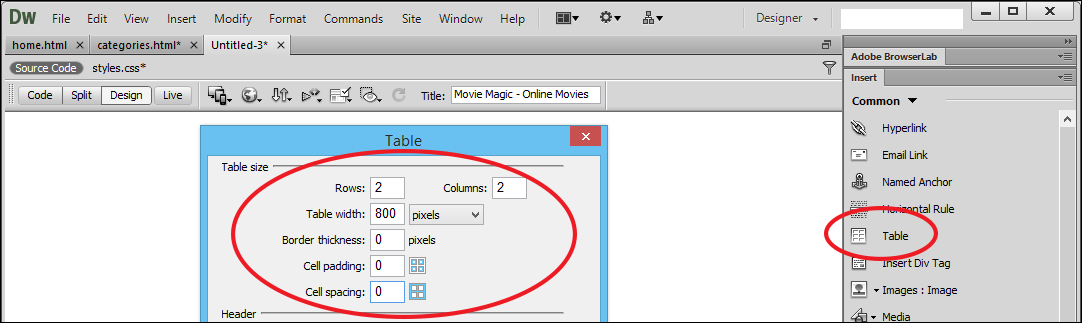
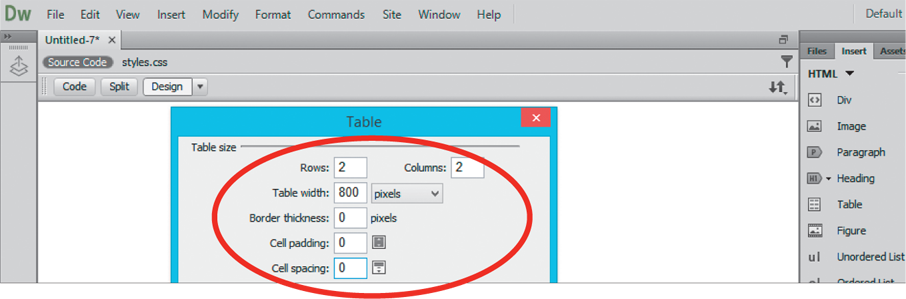
Insert a table with the values shown in the diagram.
Highlight the top row cells by dragging across them then display the MODIFY menu, highlight TABLE and select MERGE CELLS so that there is just one cell across the top row.
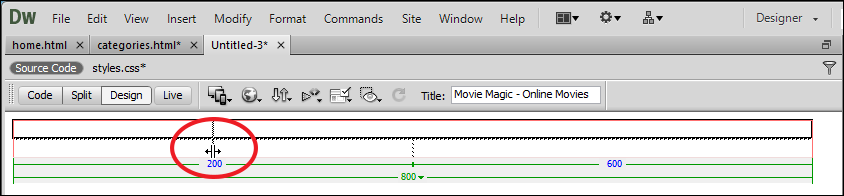
Drag the right border of the first cell in the second row to the left so that the width of the cell is about 200 px.
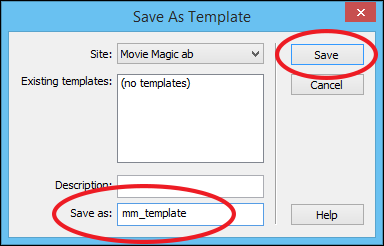
Saving the page as a template
The program needs to know that the page is a template that other pages will be using.
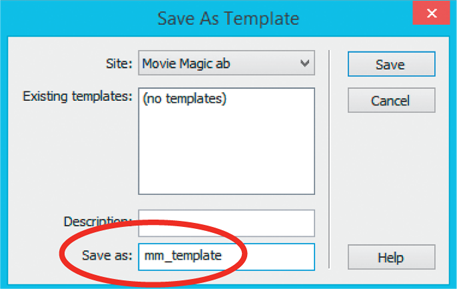
Display the FILE menu and select SAVE AS TEMPLATE.
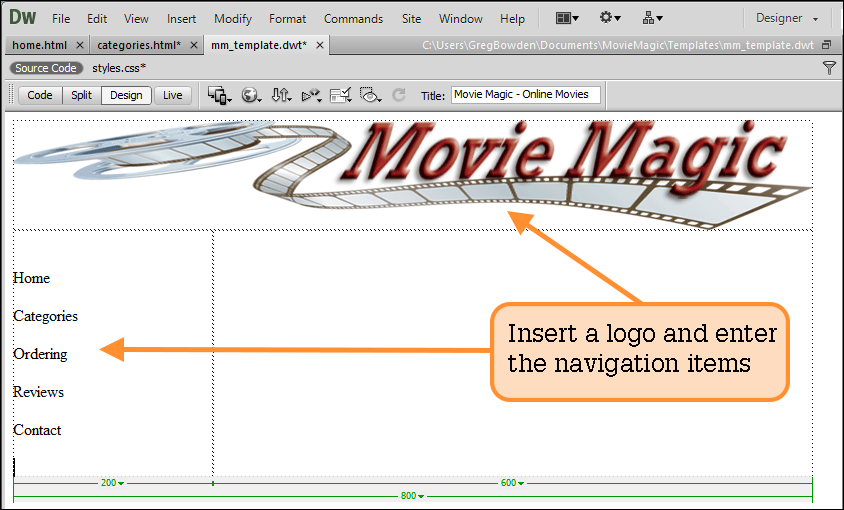
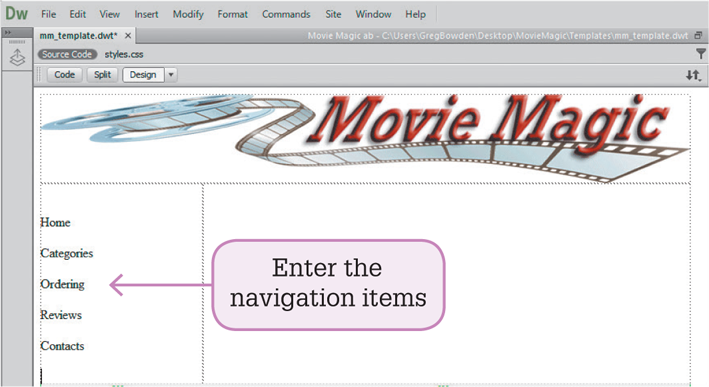
A simple logo has been prepared for you, which will be inserted in the BANNER cell and some navigation text will be entered in the lower left cell.
Click in the top cell and select the IMAGE icon in the INSERT tab of the PANEL GROUP.
Open the Logo image downloaded from the above link.
Select YES to the ROOT FOLDER warning, open your IMAGES folder and save the image.
Set the ALTERNATE TEXT to Logo image and select OK to insert the image.
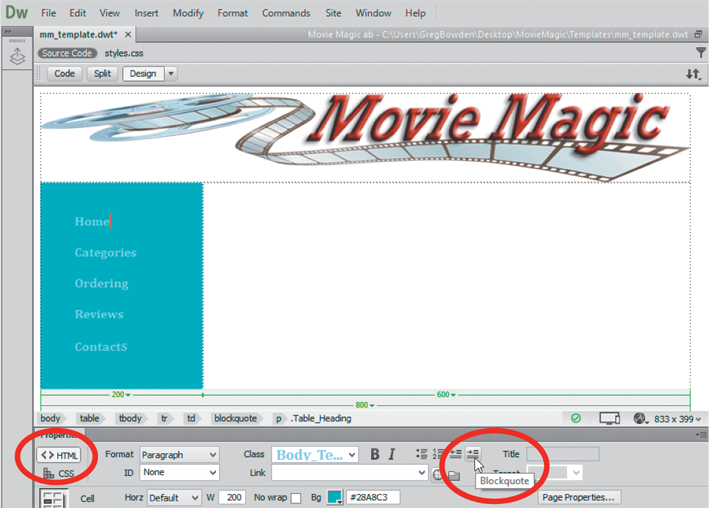
Click in the lower left cell and, in the PROPERTIES panel set the VERT box to TOP so that the text starts at the top of the cell.
Press <Enter> or <Return> to leave a blank line and enter the text shown in the diagram.
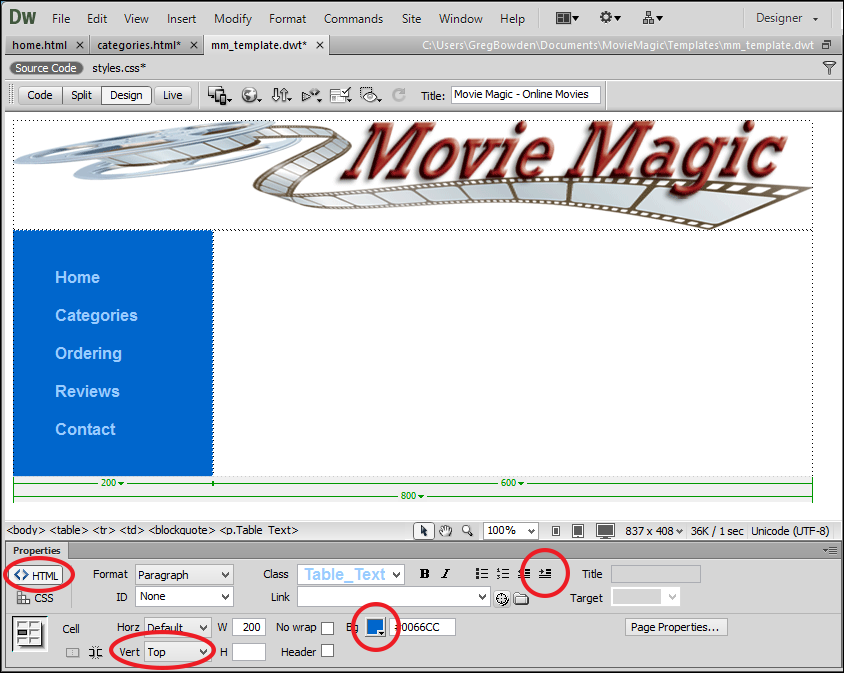
Highlight all the words and use the TARGETED RULE box in the CSS section of the PROPERTIES panel to format them to the Table_Text style.
Open the HTML section of the PROPERTIES panel, click on the BLOCKQUOTE icon to indent the words and set the BG box to a medium blue or teal to add a background to the cell.
Click in the bottom right cell and set its VERT box to TOP and its background colour to a dark blue or dark teal.
Setting the editable region
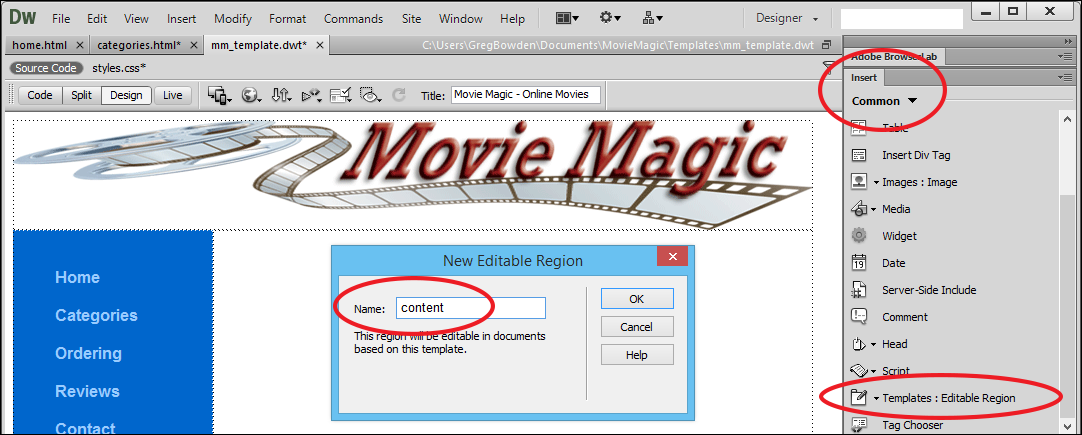
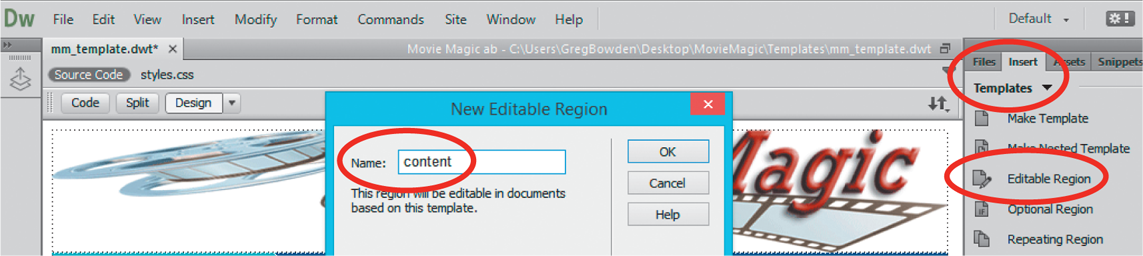
When you apply a template to another page you need to be able to make some changes to part of the page otherwise every page would simply be identical. In this case the banner graphic and text need to be the same on every page, but the lower right (or largest) cell should have different content on every page. So we need to set the CONTENT cell to be an EDITABLE REGION.
With the cursor in the lower right cell and, in the PROPERTIES panel, set the VERT box to TOP.
Scroll down the COMMON section of the INSERT panel, click on the arrow next to TEMPLATES and select EDITABLE REGION.
Call the region content and select OK.
Click on the CONTENT label and, in the PROPERTIES panel, set the VERT box to TOP and the BG box to a different shade of dark blue or teal.
Select SAVE ALL from the FILE menu to save all the files.
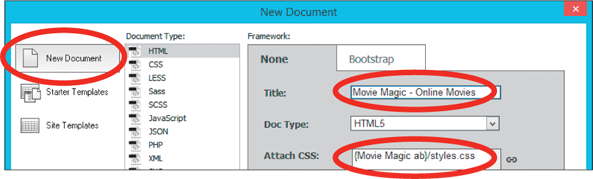
Open your Movie Magic site and select NEW from the FILE menu.
Select HTML in the DOCUMENT TYPE frame then set the TITLE box to Movie Magic – Online Movies, check that the ATTACHCSS box is set to the styles.css file and select CREATE.
Insert a table with the values shown in the diagram.
Highlight the top row cells by dragging across them then display the EDIT menu, highlight TABLE and select MERGE CELLS so that there is just one cell across the top of the table.
Drag the right border of the first cell in the second row to the left so that the width of the cell is about 200 px.
Saving the page as a template
The program needs to know that the page is a template so that other pages can use it.
A simple logo has been prepared for you, which will be inserted in the BANNER cell and some navigation text will be entered in the lower left cell.
Click in the top cell and select the IMAGE icon in the INSERT tab of the PANELGROUP.
Open the LOGO image downloaded from the above link.
Select YES to the ROOT FOLDER warning, open your Images folder and save the image.
Click in the lower left cell and in the Properties panel set the VERT box to TOP so that the text starts at the top of the cell.
Press <Enter> or <Return> to leave a blank line and enter the text shown in the diagram.
Highlight all the words and use the TARGETED RULE box in the CSS section of the Properties panel to format them to the BODY_TEXT style.
Open the HTML section of the Properties panel, click on the BLOCKQUOTE icon to indent the words and set the BG box to a medium blue or teal to add a background to the cell.
Click in the bottom right cell and set its VERT box to TOP and its background colour to a dark blue or dark teal.
Setting the editable region
When you apply a template to another page you need to be able to make some changes to part of the page, otherwise every page would simply be identical. In this case the banner graphic and text need to be the same on every page, but the lower right (or largest) cell should have different content on every page. So we need to set the CONTENT cell to be an EDITABLE REGION.
With the cursor in the lower right cell, set the Insert panel to TEMPLATES and click on the EDITABLE REGION button.
Call the region content and select OK.
Select SAVE ALL from the FILE menu to save all the documents.
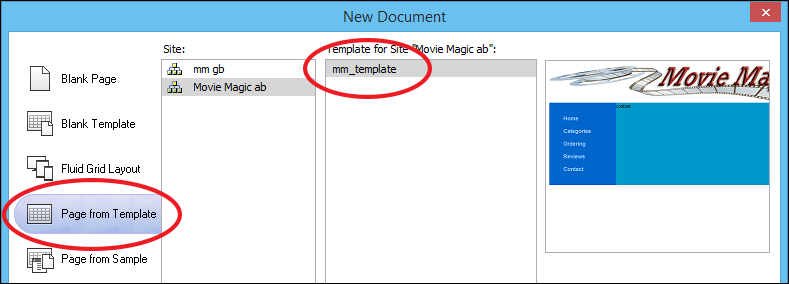
The two pages that you have already created need to be set to the template. To do this new pages will be created and the text and tables from the previous pages copied into the new pages.
Display the FILE menu and select NEW.
Select PAGE FROM TEMPLATES and your site’s template should be displayed. Select CREATE to start the new page.
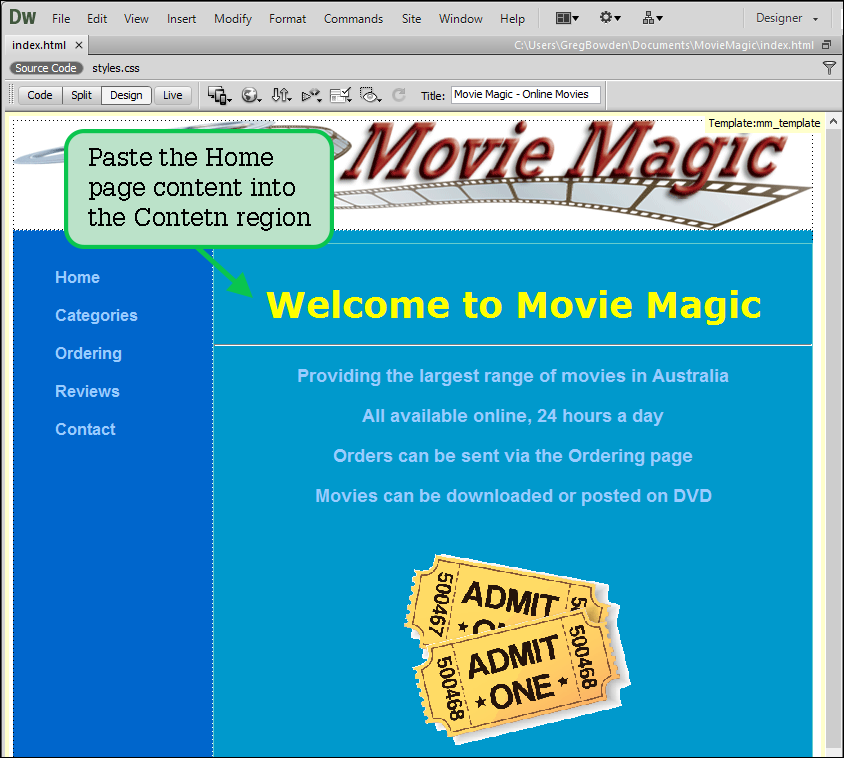
Open your HOME page, select all its contents (<Ctrl+A> or <Command+A>) and copy them (<Ctrl+C> or <Command+C>).
Open the new page, highlight the CONTENT label in the lower right cell and PASTE the content in (<Ctrl+V> or <Command+V>). Note: The image may not display properly until you save the page.
Use the FILE menu to save the page as index.html. Note: This will be the opening page for the website. Most internet service providers require the opening page to be called index.
Repeat steps 1 and 2 to create another new page from the template.
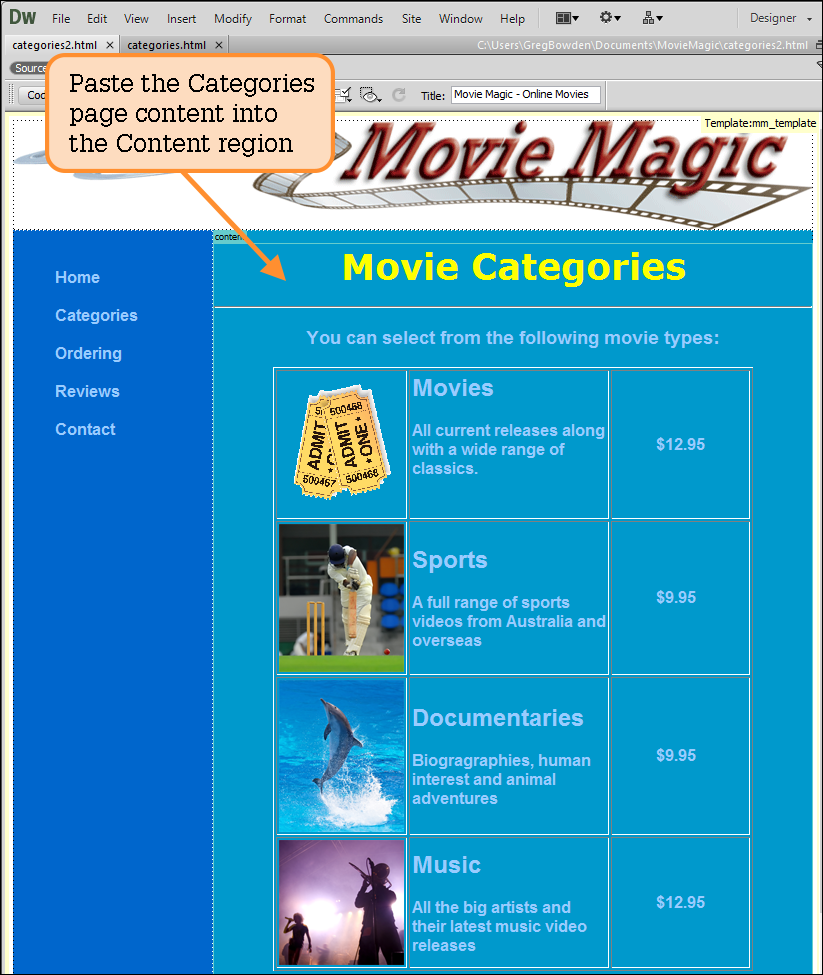
Open your CATEGORIES page, copy all the contents then open the new page, highlight the content label in the lower right cell and paste the content in.
SAVE the page as categories2.html. Note: The HOME and CATEGORIES pages can be deleted from your movie site folder using the FILES panel in the PANEL GROUP.
The two pages that you have already created need to be set to the template. To do this, new pages will be created and the text and tables from the previous pages copied into the new pages.
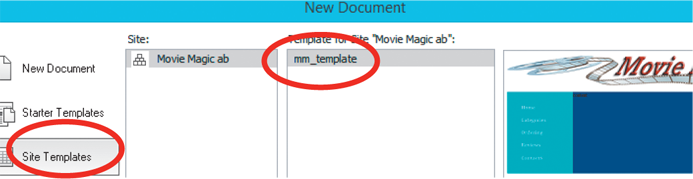
Display the FILE menu and select NEW.
Select SITE TEMPLATES and your site’s template should be displayed. Select CREATE to start the new page.
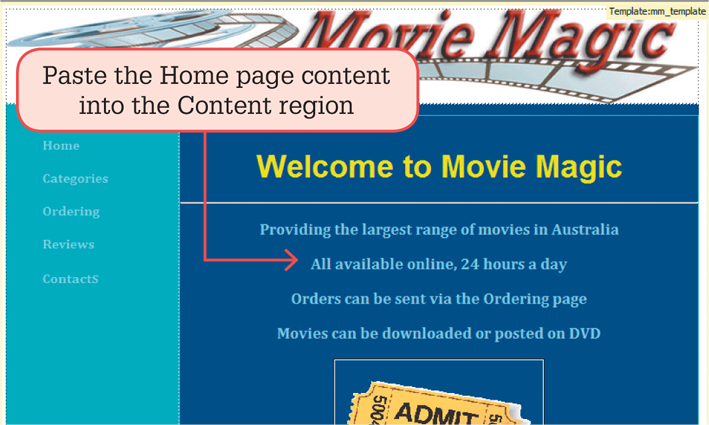
Open the home.html page, select all its contents (<Ctrl+A> or <Command+A>) and copy them (<Ctrl+C> or <Command+C>).
Open the new page, highlight the CONTENT label in the lower right cell and PASTE the content in (<Ctrl+V> or <Command+V>).
Note: The image may not display properly until you save the page.
Use the FILE menu to save the page as index.html.
Note: This will be the opening page for the website. Most internet service providers (ISPs) require the opening page to be called index.
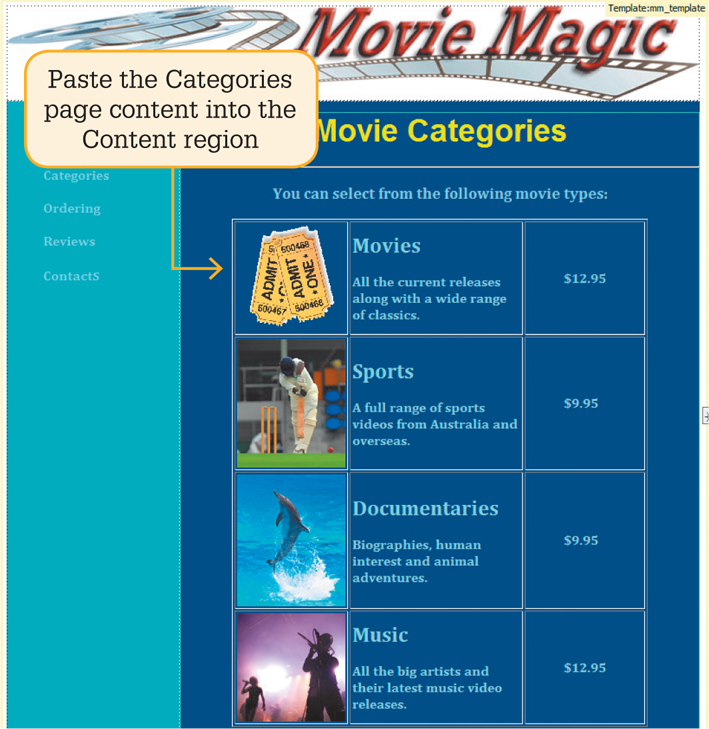
Create another new page from the template.
Open the categories.html page, copy all the contents then open the new page, highlight the content label in the lower right cell and paste the content in.
Save the page as categories2.html.
Note: The home.html and categories.html pages can be deleted from your Movie Site folder using the FILES panel in the PANELGROUP.
Some more pages are needed from the template. One to show the company’s contact details and a second to show some movie reviews. An ordering page will be created in a later exercise.
Creating the contacts page
Create a NEW page from the template.
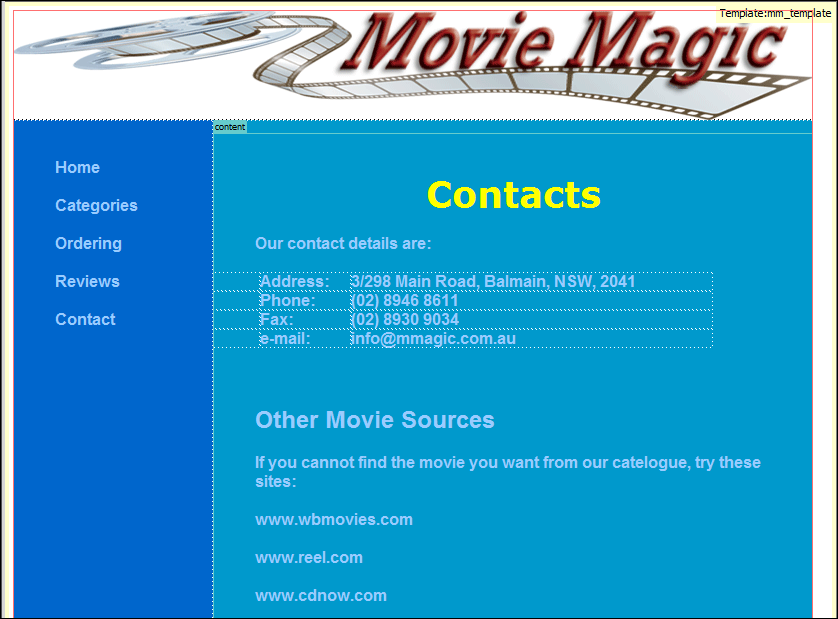
Highlight the CONTENT label in the lower right cell, press <Enter> or <Return> to leave a blank line and enter the details shown in the diagram.
A four-row, three-column table with a width of 500 px , no border, cell padding or cell spacing can be used for the address section. The first column can be left blank and the column widths adjusted.
Format the heading to the HEADING style and the rest of the text to the Table_Heading and Table_Text styles (or you can create some styles of your own to format the text).
Each line can be indented using the BLOCKQUOTE icon in the PROPERTIES panel.
SAVE the page as contacts.html.
Creating the movie reviews page
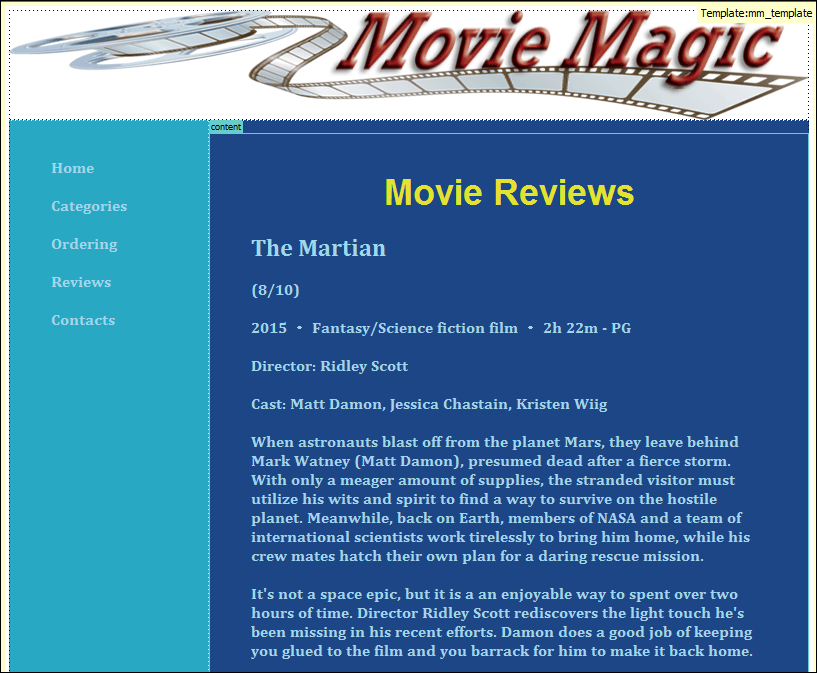
Create a NEW page from the template.
Highlight the CONTENT label in the lower right cell, press <Enter> or <Return> to leave a blank line and enter the heading: Movie Reviews
Enter a review of a movie you have recently seen and format its text appropriately. If you cannot think of anything to review, the sample text in the diagram can be entered.
Some more pages are needed from the template: one to show the company’s contact details and a second to show some movie reviews. An ordering page will be created in a later exercise.
Creating the contacts page
Create a NEW page from the template.
Highlight the CONTENT label in the lower right cell, press <Enter> or <Return> to leave a blank line and enter the details shown in the diagram.
A four-row, three-column table with a width of 400 px, no border, cell padding or cell spacing can be used for the address section. The first column can be left blank and the column widths adjusted.
Format the heading to the Heading style and the rest of the text to the Table_Heading and Table_Text styles (or you can create some styles of your own to format the text).
Each line can be indented using the BLOCKQUOTE icon in the Properties panel.
Save the page as contacts.html.
Creating the movie reviews page
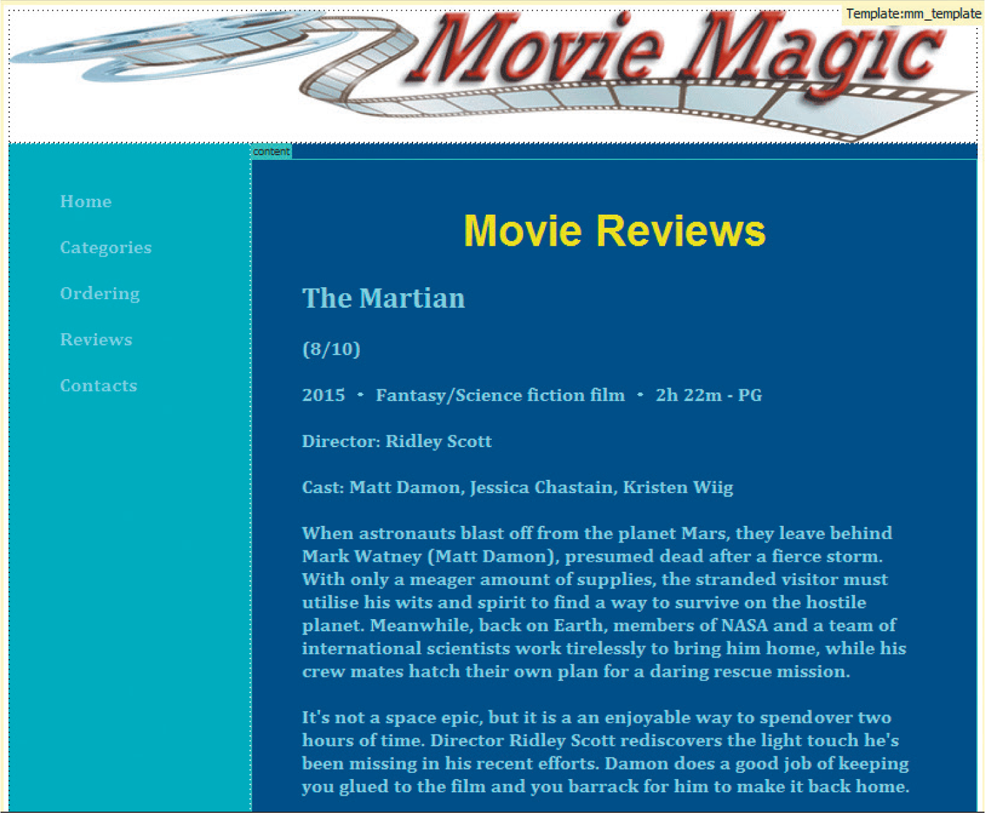
Create a NEW page from the template.
Highlight the CONTENT label in the lower right cell, press <Enter> or <Return> to leave a blank line and enter the heading Movie reviews.
Enter a review of a movie you have recently seen and format its text appropriately. If you cannot think of anything to review, the sample text in the diagram can be entered.