Sometimes there are small blemishes over parts of a photograph or image that you wish to repair. For example, you might want to cover a freckle or bruise on a photograph of a person, or remove scratches from the paintwork of a car. Photo editing programs provide many tools to do this. We will look at two here: the spot healing brush tool and the healing brush tool.
The spot heal tool is a quick way to replace blemishes with areas from close to the problem area.
Direct your browser to pixlr.com and launch the Pixlr Editor web app. Select OPEN IMAGE FROM COMPUTER from the Welcome screen. Access the image data file downloaded from the above link.
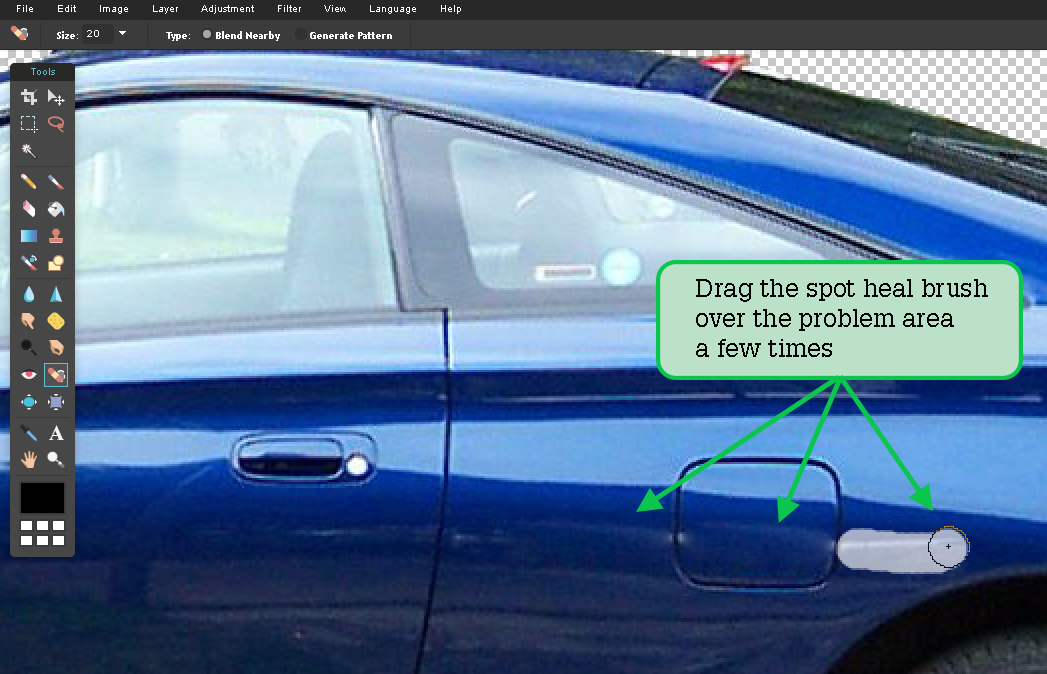
Notice that there appears to be a white scratch along the rear of the car near the fuel cap (it is actually a reflection). Let’s remove it to avoid confusion.
Select the SPOT HEAL TOOL from the Tools panel.
In the OPTIONS BAR set the SIZE to about 20 px, then set the ZOOM to 200% by pressing <Ctrl+> or <Command+> and scroll so that the fuel cap of the car is in view.
Drag the SPOT HEAL brush across the white lines a few times to remove them.
Press <Ctrl+0> or <Command+0> to return the view to FIT ON SCREEN to see the effect of the adjustment.
SAVE the file in your Storage folder if you wish to, then close the file.
The clone stamp tool
The clone stamp tool is more accurate for repairing images because you select the sample area to be applied to the blemish, so if the spot heal tool does not do an adequate job, the clone stamp tool can be used.
Reload the original image data file from the above link.
ZOOM to 200% and scroll to the fuel tank cap.
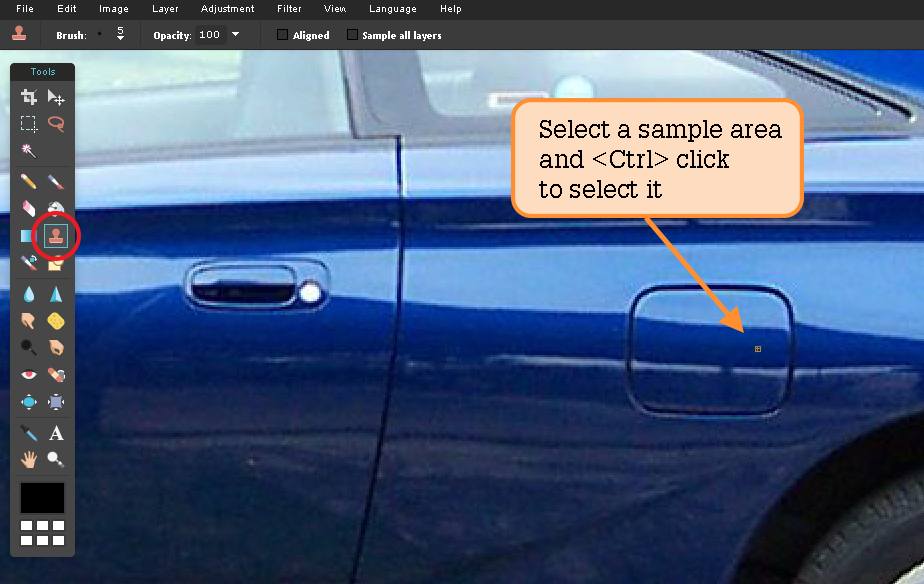
Select the CLONE STAMP TOOL from the TOOLS panel.
In the OPTIONS BAR, set the BRUSH SIZE to 5 px.
Move the point to the dark blue area above the white in the fuel cap. Hold down the <Ctrl> or <Command> key and click the mouse button to select that area.
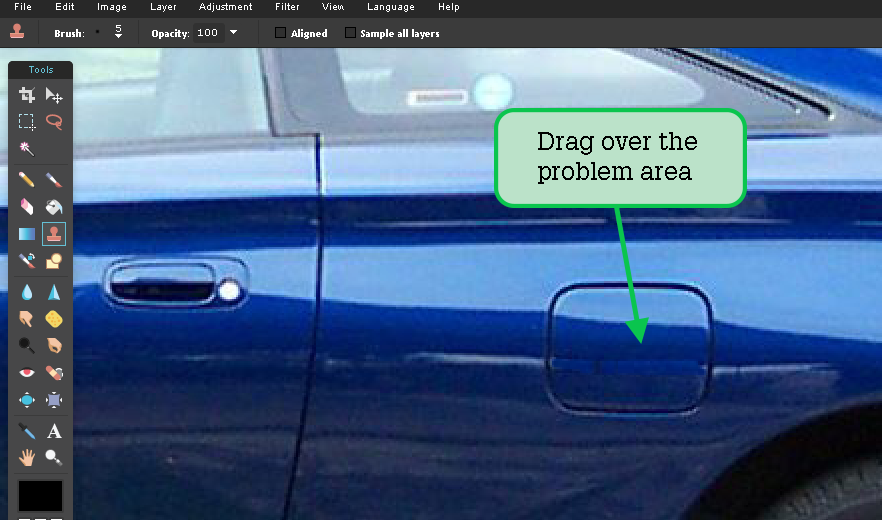
Release the key and drag over the white in the fuel cap. The circular marker shows you the area of the image that is replacing the problem area.
You can <Ctrl> or <Command> click on a new sample area if you wish to, or simply drag over the white areas on either side of the fuel tank.
Press <Ctrl+0> or <Command+0> to return the view to FIT ON SCREEN to see the effect of the adjustment.
SAVE the file in your Storage folder if you wish to, then close the file.
The spot healing brush tool is a quick way to replace blemishes with areas from close to the problem area.
Load Photoshop and select OPEN from the FILE menu. Access the image data file downloaded from the above link.
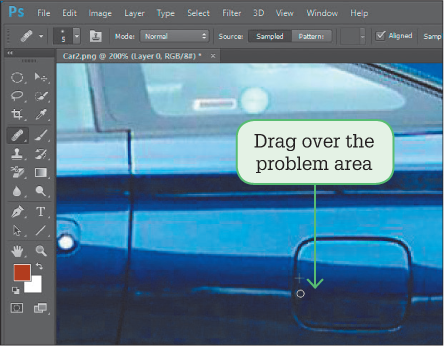
Notice that there appears to be a white scratch along the rear of the car near the fuel cap (it is actually a reflection). Let’s remove it to avoid confusion.
Select the SPOT HEALING BRUSH TOOL from the Tools panel.
In the OPTIONS bar set the BRUSH SIZE to about 20 px and the HARDNESS to 100%, then set the Zoom to 200% by pressing <Ctrl+> or <Command+> and scroll so that the fuel cap of the car is in view.
Drag the SPOT HEALING BRUSH across the white lines a few times to remove them. Note: You can increase or decrease the Brush Size using keyboard shortcuts. Press the Close Square Bracket key <]> to increase the size of the brush. Press the Open Square Bracket key <[> to decrease the size of the brush.
Press <Ctrl+0> or <Command+0> to return the view to FIT ON SCREEN to see the effect of the adjustment.
Save the file in your storage folder if you wish to then close the file.
The healing brush tool
The healing brush tool is more accurate for repairing images because you select the sample area to be applied to the blemish, so if the spot healing brush tool does not do an adequate job, the healing brush tool can be used.
Reload the original version of the file downloaded above.
Zoom to 200% and scroll to the fuel tank cap.
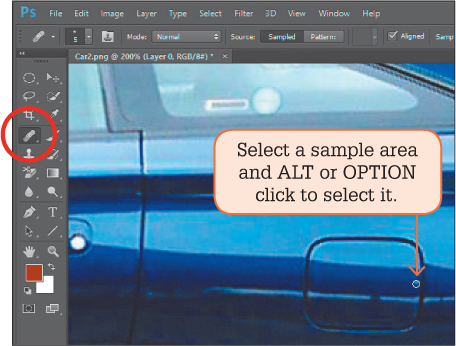
Select the HEALING BRUSH TOOL from the Tools panel – it is within the SPOT HEALING BRUSH TOOL.
Press the [ key until the brush size is reduced to about 5 px.
Move the point to the dark blue area above the white in the fuel cap, hold down the <Alt> or <Option> key and click the mouse button to select that area.
Release the <Alt> or <Option> key and drag over the white in the fuel cap. The + marker shows you the area of the images that is replacing the problem area
You can <Alt> or <Option> click on a new sample area if you wish to or simply drag over the white areas on either side of the fuel tank.
Press <Ctrl+0> or <Command+0> to return the view to FIT ON SCREEN to see the effect of the adjustment.
Save the file in your storage folder if you wish to then close the file.
The skin complexion in a photo can be enhanced to reduce blemishes and spots so that the skin looks smooth.
Direct your browser to pixlr.com and launch the Pixlr Editor web app. Select OPEN IMAGE FROM COMPUTER from the Welcome screen. Access image data file downloaded from the above link.
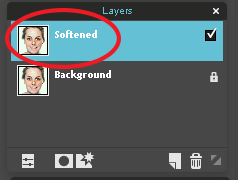
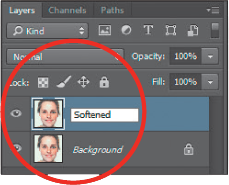
Right-click on ‘Background’ in the Layers panel and select DUPLICATE LAYER. A duplicate layer means that major changes can be made to the copy without affecting the original image.
Double click on the new layer in the LAYERS panel and change its name to ‘Softened’.
The duplicated layer will be blurred to give the skin a softer, more even look. After this, sections of the image such as the eyes and mouth can be sharpened.
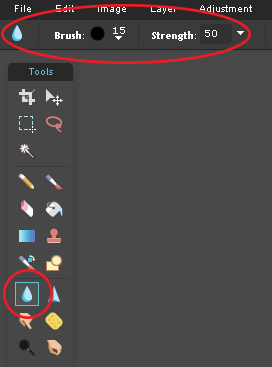
Select the BLUR TOOL from the Tools panel at the left of the screen. In the OPTIONS BAR, set the BRUSH DIAMETER size to 15 px and the STRENGTH slider to 50%.
Go to the FILTER menu and select BLUR. The tone of the skin should look softer and smoother.
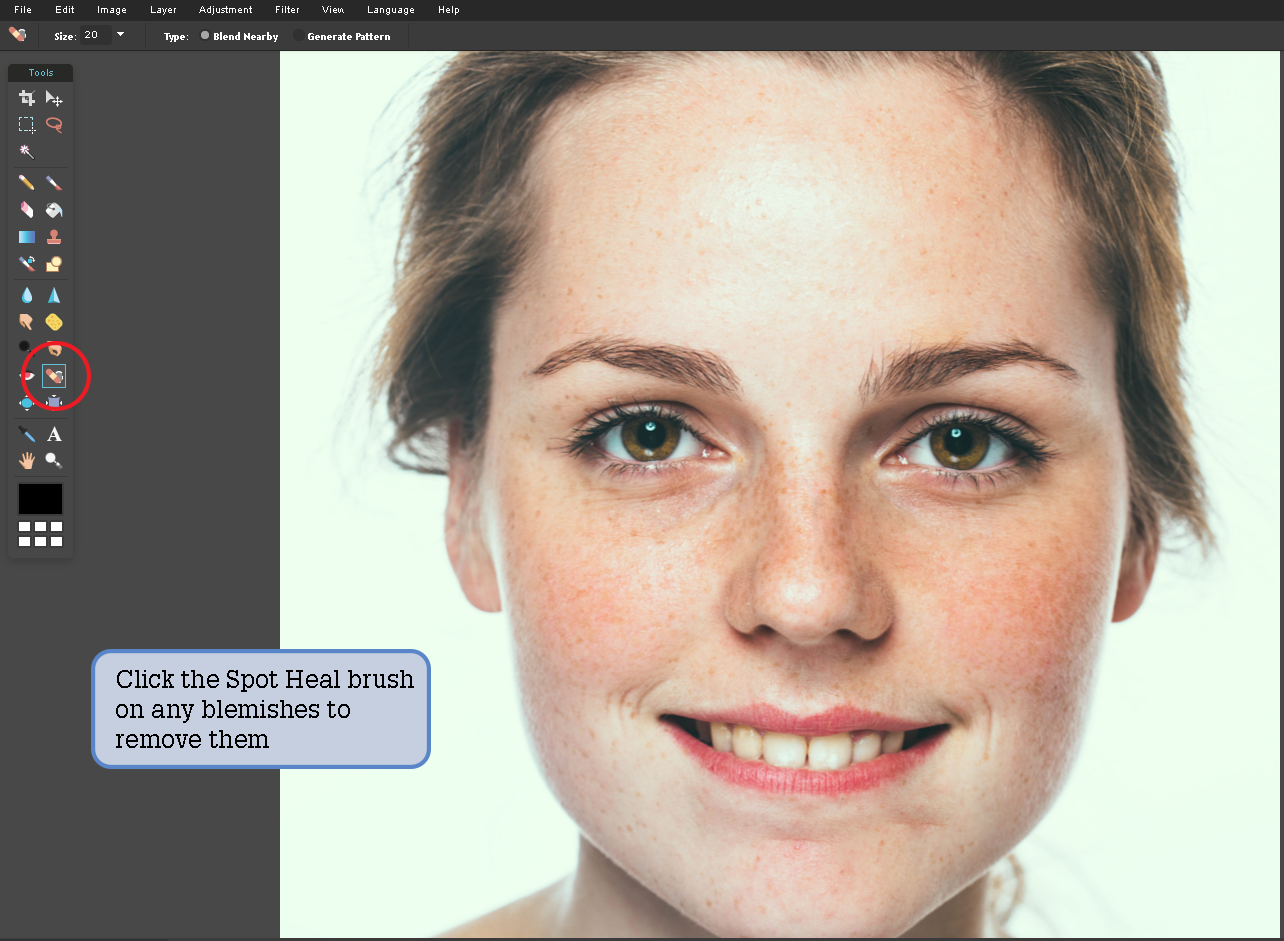
Select the SPOT HEAL TOOL from the Tools panel and click on any blemishes on the face to remove them.
You can turn the visibility of the Softened layer off by un-ticking the box, see the original image then turn the view back on.
SAVE the image in your storage folder as a .PXD file under the name ‘Face’.
The skin complexion in a photo can be enhanced to reduce blemishes and spots so that the skin looks smooth.
Open the image data file downloaded from the above link.
A duplicate of the layer will be made so that major changes can be made to the copy without affecting the original image. Press <Ctrl+J> or <Command+J> to duplicate the background layer.
Double click on the new layer label in the LAYERS panel and change its name to ‘Softened’.
Note: You can also select DUPLICATE LAYER from the Layer menu to duplicate the layer.
The duplicated layer will be blurred to give the skin a softer, more even look. After this, sections of the image such as the eyes and mouth can be sharpened.
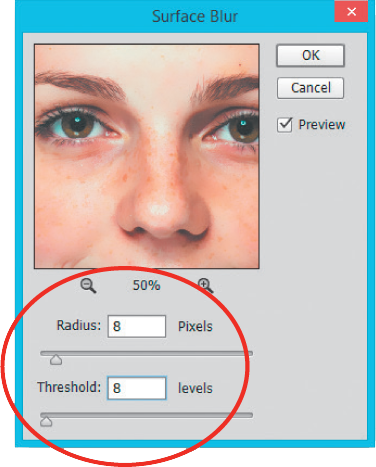
Display the FILTER menu, highlight BLUR and select SURFACE BLUR.
Click on the ZOOM OUT icon to reduce the view to 50% so that you can see most of the face then set the RADIUS to about 8 pixels and the THRESHOLD to 8. Note: In the PREVIEW box you can scroll the picture around. Click and hold on the image in the PREVIEW box and the original image is displayed. When you release the mouse button the effect of the blur is shown.
Select OK and the tone of the skin should look softer and smoother.
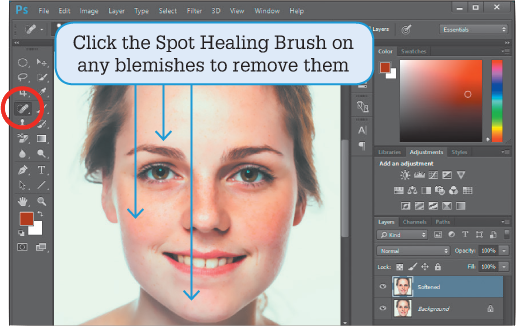
Select the SPOT HEALING BRUSH TOOL from the Tools panel and click on any blemishes on the face to remove them. Note: If the blurring is too artificial, you can reduce the Opacity of the Softened layer so that a little of the Background layer is seen through it. The OPACITY box is at the top right of the Layers panel.
You can turn the visibility of the softened layer off to see the original image then turn the view back on.
Save the image in your storage folder as a Photoshop file under the name: Face.
Painting on a transparent mask to display the original features through the blurred layer can highlight important parts of the face such as the eyes, eyebrows, mouth and hair.
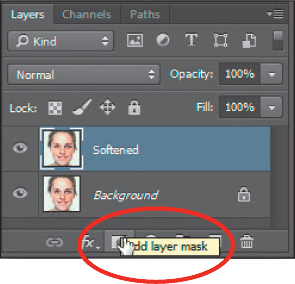
With the ‘Face’ image open, right-click on the ‘Softened’ layer in the Layer panel. Select ADD LAYER MASK from the menu to add a mask to it.
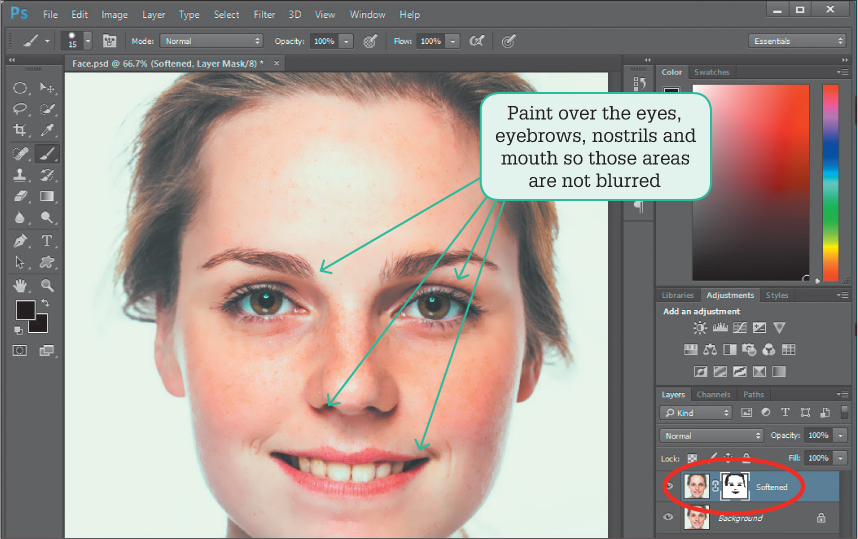
Select the BRUSH TOOL from the Tools panel, and select a 15 px brush from the OPTIONS BAR.
Set the MAIN COLOUR to Black if it isn’t already, then paint over the eyes, eyelids, mouth, nostrils and hair. Those parts of the image from the Background layer will become visible and thus look a little brighter. Note: By blurring the image, we have set the skin tones to look more consistent and then sharpened the important parts of the image. You should see the areas you painted in the MASK thumbnail box on the Softened layer.
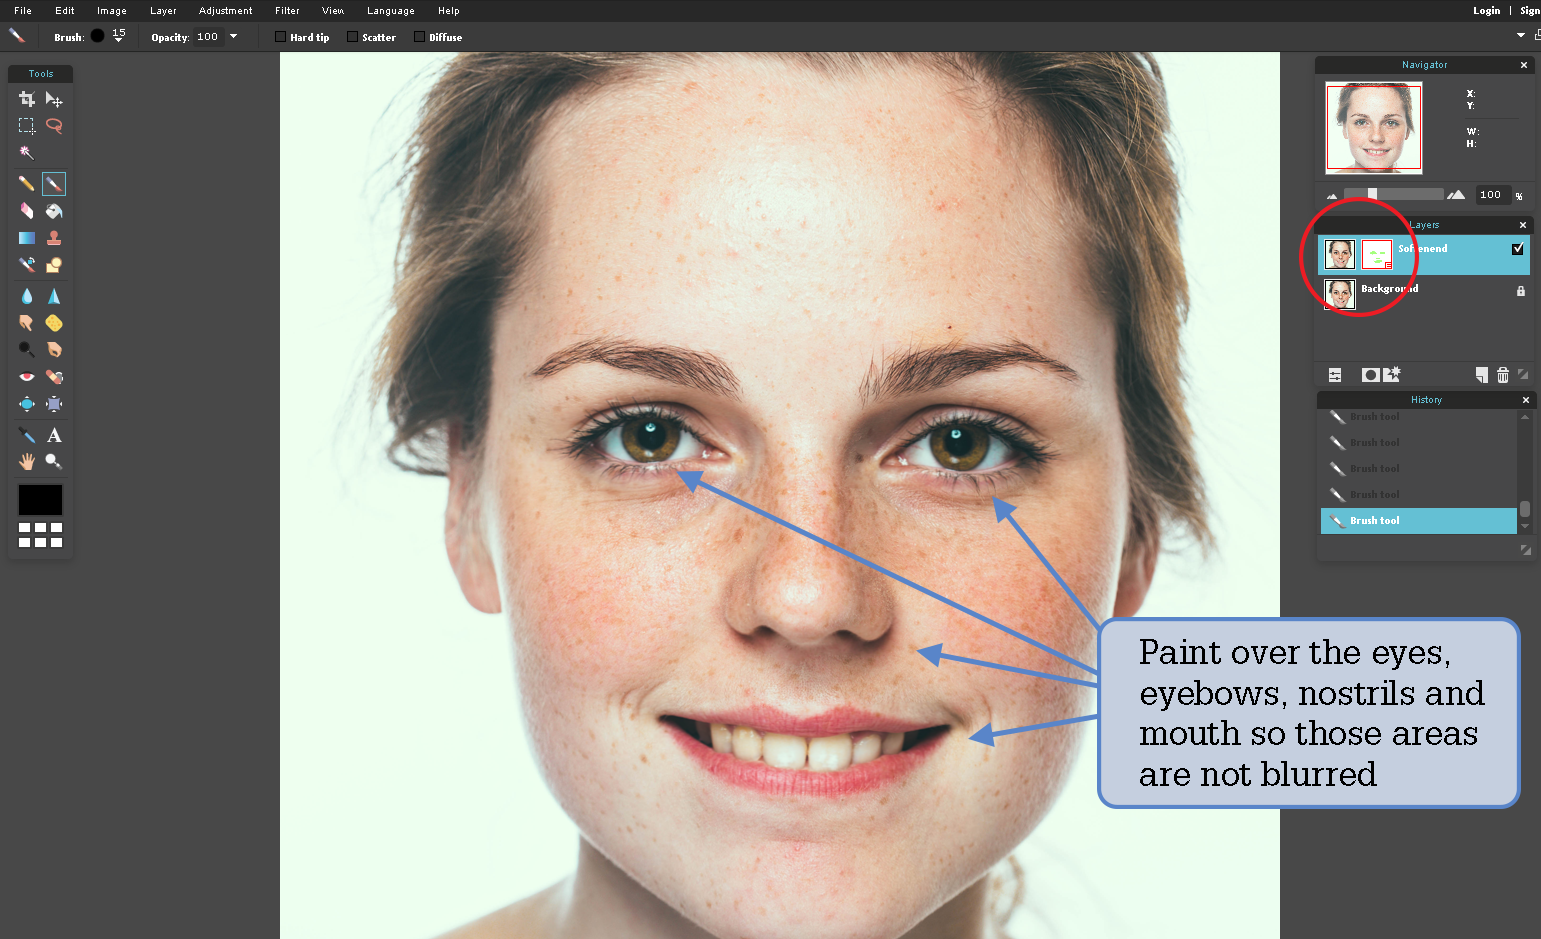
Painting on a transparent mask to display the original features through the blurred layer can highlight important parts of the face such as the eyes, eyebrows, mouth and hair.
With the Face image open, select the SOFTENED layer and click on the ADD LAYER MASK icon at the base of the Layers panel to add a mask to it.
Select the BRUSH TOOL from the Tools panel and, in the options bar, select a 15 px brush and NORMAL mode.
Set the FOREGROUND COLOUR to black, paint over the eyes, eyelids, mouth, nostrils and hair and those parts of the image from the background layer will become visible hence look a little brighter.
Note: By blurring the image we have set the skin tones to look more consistent and then sharpened the important parts of the image. You should see the areas you painted in the Mask thumbnail box next to the Softened layer.
You can improve an image by making the whites of the eyes and the teeth a little whiter.
Zoom in on the eyes and mouth.
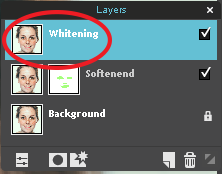
Press <Ctrl+J> or <Command+J> to duplicate the Softened layer, then right-click on the duplicated layer and select DELETE LAYER MASK.
Rename the new layer ‘Whitening’.
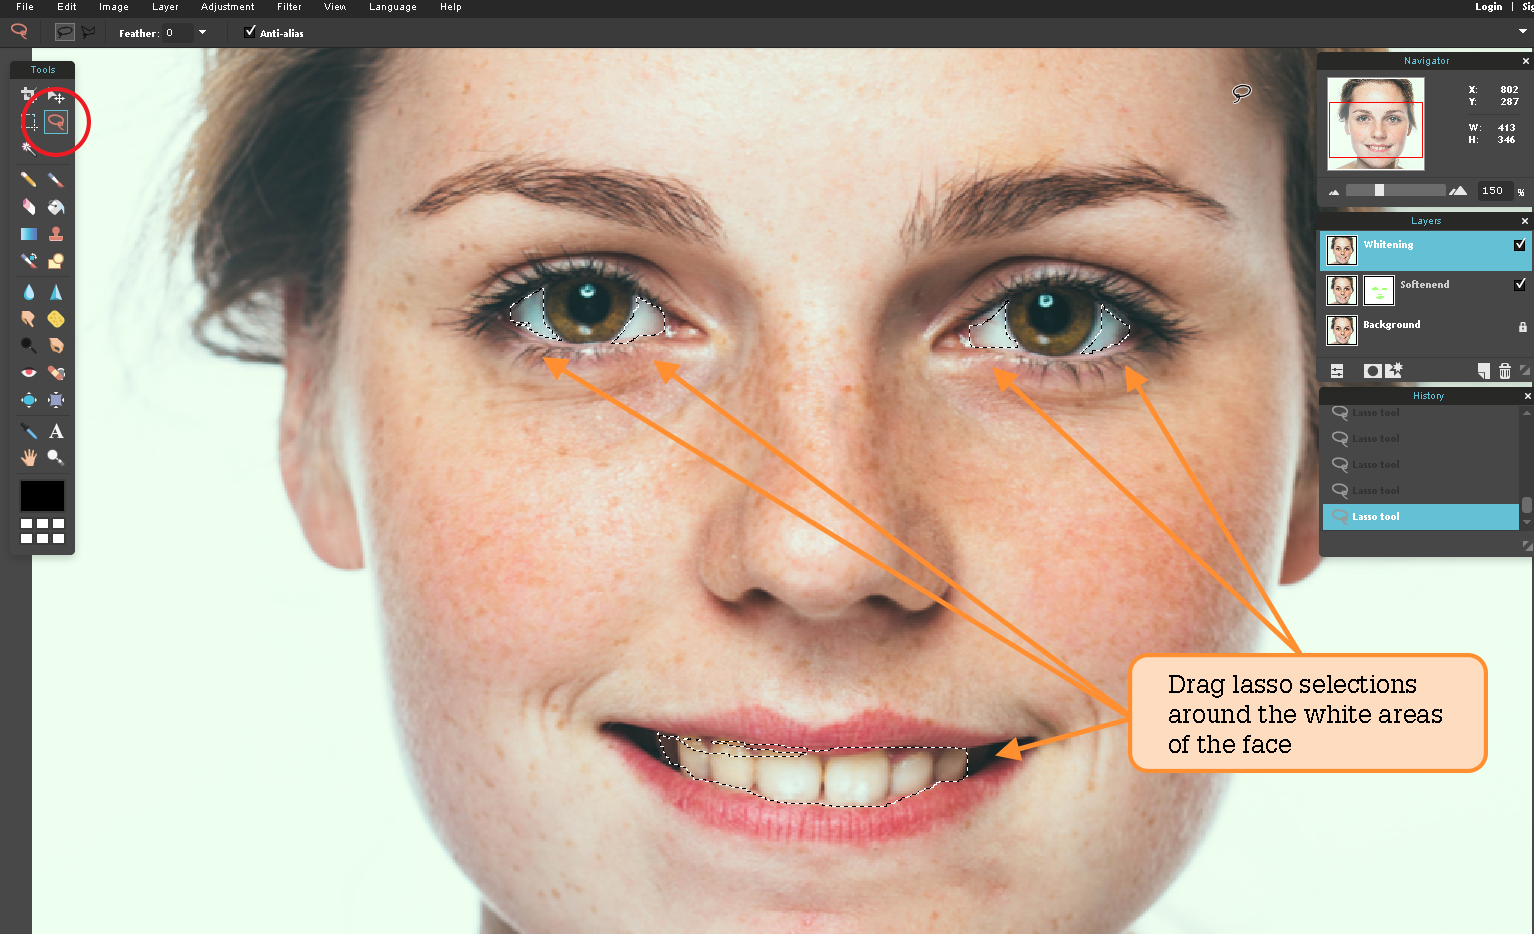
Select the LASSO TOOL from the Tools panel and drag a selection around the white area at the left of the left eye.
Hold down the <Shift> key and drag selections around the other white areas of the eyes and around the teeth. Note: If you make a mistake with a selection, press <Ctrl+Z> or <Command+Z> to undo the selection and try again.
The selections can be feathered to smooth the effect. In the OPTIONS BAR, set the FEATHER slider to 1 px.
Go to the ADJUSTMENT menu and select HUE/SATURATION.
The colour (HUE) does not need to be changed, just the SATURATION, so set the SATURATION bar to −60 and select OK.
Press <Ctrl+0> or <Command+0> to return the view to FIT ON SCREEN and press <Ctrl+D> or <Command+D> to deselect the parts of the image that are selected.
You can improve an image by making the whites of the eyes and the teeth a little whiter.
Zoom in on the eyes and mouth.
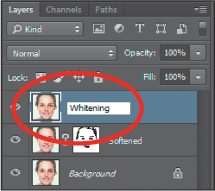
Press <Ctrl+J> or <Command+J> to duplicate the Softened layer then click on the duplicated mask box and click on the DELETE icon at the base of the Layers panel followed by DELETE to remove it.
Rename the new layer ‘Whitening’.
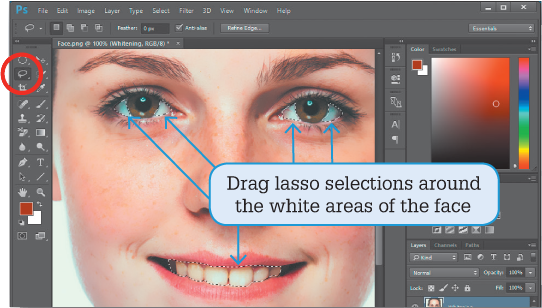
Select the LASSO TOOL from the Tools panel and drag a selection around the white area at the left of the left eye.
Hold down the <Shift> key and drag selections around the other white areas of the eyes and around the teeth. Note: If you make a mistake with a selection, press <Ctrl+Z> or <Command+Z> to undo the selection and try again.
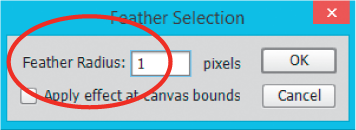
The selections can be feathered to smooth the effect. Display the Select menu, highlight MODIFY and select FEATHER.
Set the FEATHER RADIUS to 1 px and select OK.
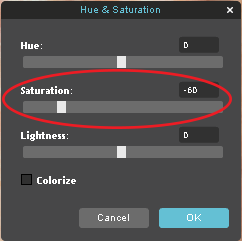
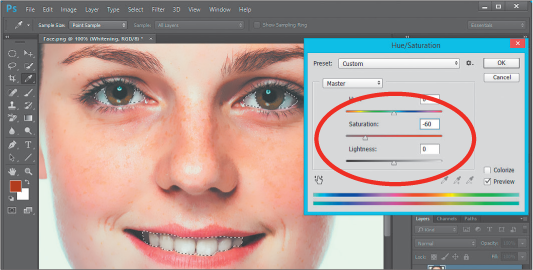
Display the IMAGE menu, highlight ADJUSTMENTS and select HUE/SATURATION.
The colour (hue) does not need to be changed, just the SATURATION, so set the SATURATION bar to –60 and select OK.
Press <Ctrl+0> or <Command+0> to return the view to FIT ON SCREEN and press <Ctrl+D> or <Command+D> to deselect the parts of the image that are selected.
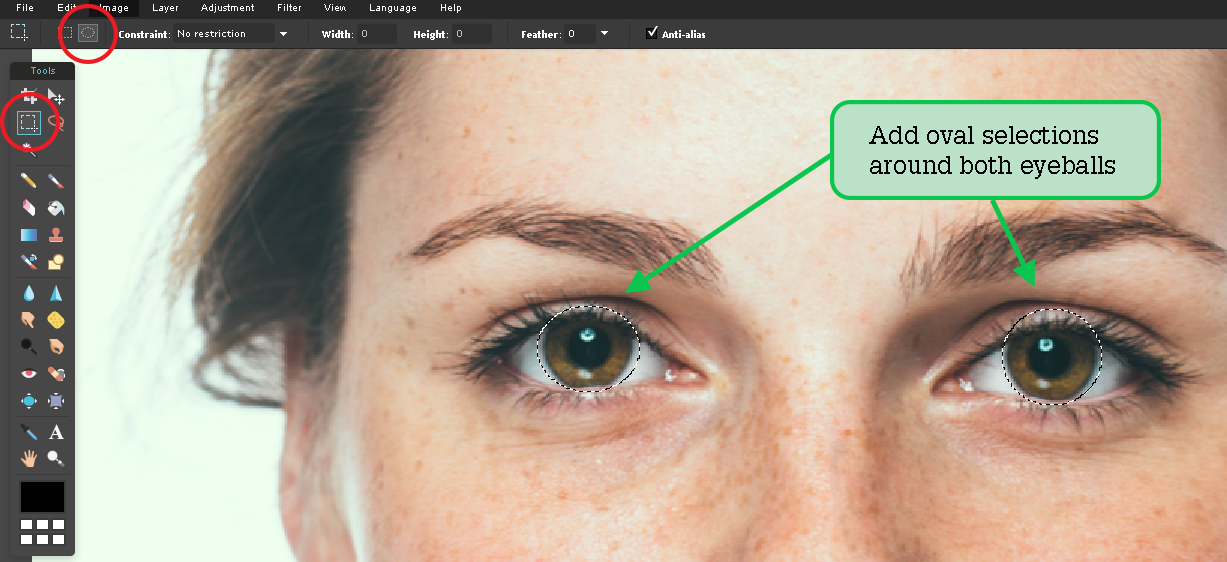
The eye colour can be enhanced or completely altered.
Zoom in on the eyes by pressing <Ctrl+> or <Command+>.
Select the MARQUEE TOOL from the Tools panel, then set it to ELLIPTICAL MARQUEE in the OPTIONS BAR. Drag an oval around the left eyeball. Note: It doesn’t matter that part of the eyelashes are included in the selection.
Hold down the <Shift> key and drag another oval around the right eyeball.
In the EDIT menu, select COPY, then select PASTE to place the eyeballs selections in a separate layer.
Rename the new layer ‘Eye colour’.
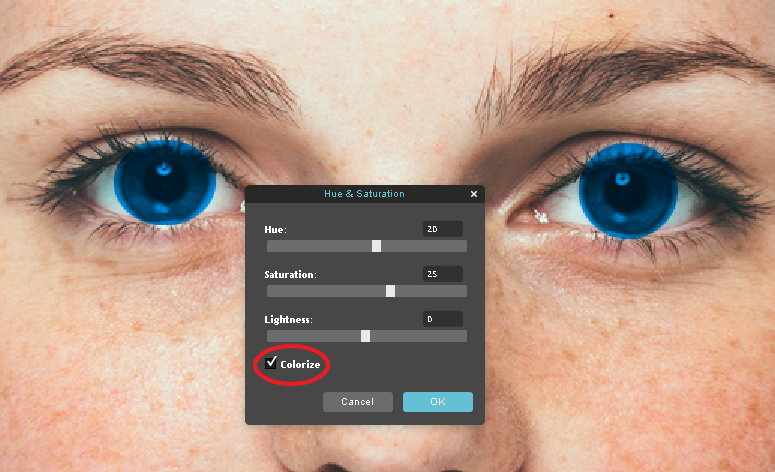
Go to the ADJUSTMENT menu and select HUE/SATURATION.
Tick the COLORIZE box. Set the HUE and SATURATION bars to create the eye colour that you want, then select OK.
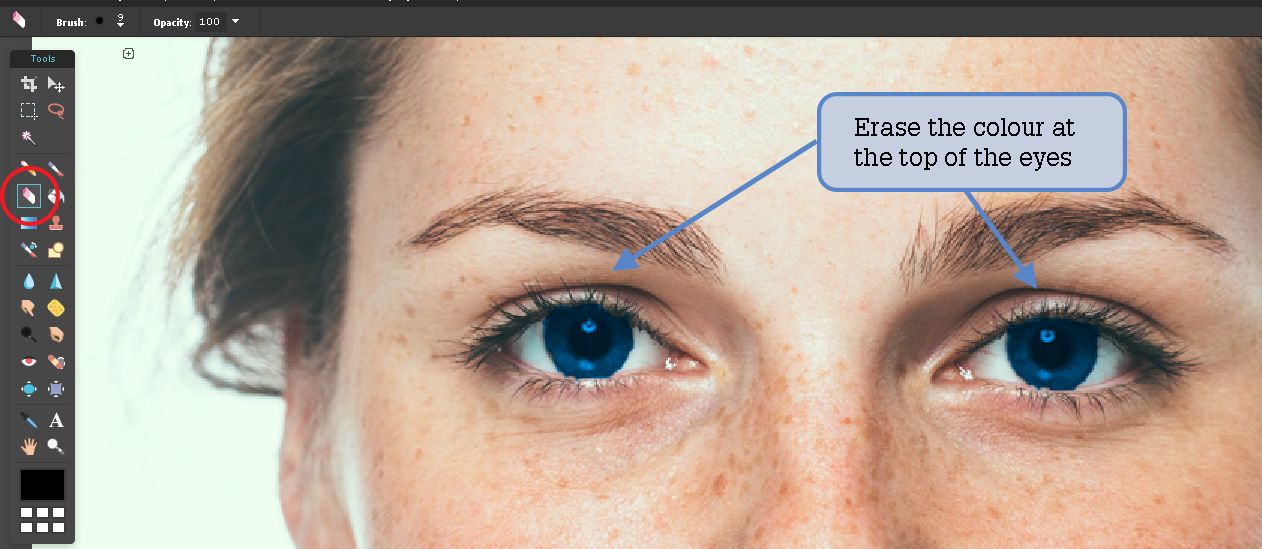
Part of the eye colour is overlapping the eyelashes and other areas. To remove this, select the ERASER TOOL from the Tools panel, set the BRUSH diameter to 9 px in the OPTIONS BAR, and erase the part of the eye colour that overlaps the eyelashes. Note: The eyelashes won’t be removed when you erase part of the eye colour because the erase part is visible from other layers.
Press <Ctrl+0> or <Command+0> to return the view to FIT ON SCREEN and resave the image.
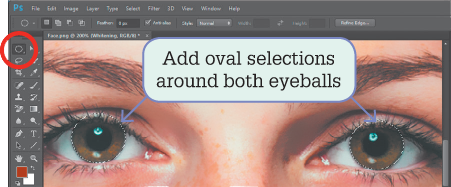
The eye colour can be enhanced or completely altered.
Zoom in on the eyes by pressing <Ctrl+> or <Command+>.
Select the ELLIPTICAL MARQUEE TOOL from the Tools panel and drag an oval around the left eyeball. Note: It doesn’t matter that part of the eyelashes are included in the selection.
Hold down the <Shift> key and drag another oval around the right eyeball.
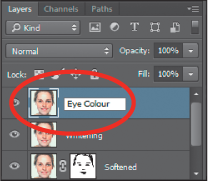
Display the LAYER menu, highlight NEW and select LAYER VIA COPY to place the eyeballs selections in a separate layer.
Rename the new layer ‘Eye colour’.
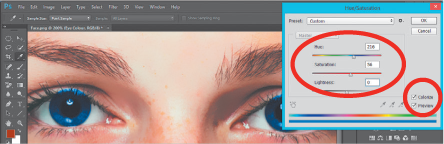
Display the IMAGE menu, highlight ADJUSTMENTS and select HUE/SATURATION.
Turn on the COLOURIZE box and adjust the HUE and SATURATION bars to create the eye colour that you want then select OK.
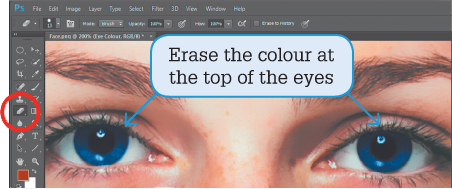
Part of the eye colour is overlapping the eyelashes. To remove this, select the ERASER TOOL from the Tools panel and erase the part of the eye colour that overlaps the eyelashes. Note: The eyelashes won’t be removed when you erase part of the eye colour because the erase part is visible from other layers.
Press <Ctrl+0> or <Command+0> to return the view to FIT ON SCREEN and resave the image.